
Walter the Walrus - Part Three
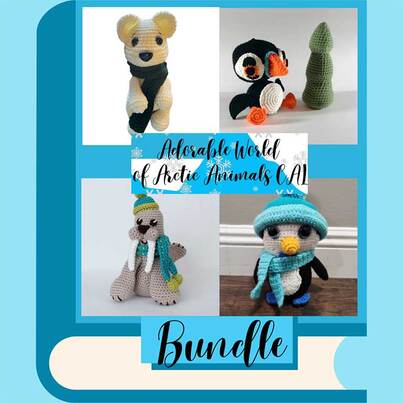
Adorable World of Arctic Animals CAL

|

This pattern uses US Crochet Terms
for the UK Terms version click HERE |
Welcome to Part Three of Walter the Walrus!
I hope you enjoyed making Walter's Head, Body and Front Flippers in Part One of the CAL and his Back Flippers, Muzzle, Tusks, Eyes and Nose in Part Two. Just his Hat and Scarf left to make in Part Three - plus the Making up instructions and his Embroidered Details, your Walter will be done in no time!
If you prefer to work from a printed pattern, all four of the CAL patterns are still available as a PDF Bundle to buy, just click the button below (this is an affiliate link - I'll earn a small commission.)
If you prefer to work from a printed pattern, all four of the CAL patterns are still available as a PDF Bundle to buy, just click the button below (this is an affiliate link - I'll earn a small commission.)
Walter is made on a 4mm Hook using Worsted (Aran) weight 100% Acrylic yarn.
A reminder of the colors…
MC: Parchment 2010 - for Head, Body, Flippers and Muzzle.
CC1: White 1001 - for Tusks, Eye highlights and Back detail.
CC2: Tawny 1064 - for Eyes, Nose and Embroidered Details.
CC3: Ocean 2015 - for Hat and Scarf.
CC4: Chartreuse 1822 - for Hat and Scarf.
If you're late to the party, don't worry, full details re Yarn, Hook, Techniques etc are in Part One, just click HERE.
US Crochet Terms - Abbreviations
This pattern is written using US Crochet Terms - they are NOT the same as UK ones! If you usually use UK terms, please familiarise yourself with the US terms to avoid your character’s shape distorting.
The “sc” abbreviation used in this pattern refers to US single crochet. The equivalent stitch in UK terms is known as double crochet - if you are used to UK patterns you need to work UK double crochet everywhere this pattern says “sc”.
You can find a UK Terms version of the pattern HERE.
Share your progress! Post a picture in the Crochet with the Crochet Wizzard Facebook Group or tag @crochetwizzardcal on Instagram!
Let's get crocheting!

Hat
Made from the top down. Stuff at the end. Hat Bobble made separately.
Rnd 1: With CC3 and working into a magic ring, 6 sc. 6 sts
Rnd 2: 2 sc in each st around. 12 sts
Rnd 3: [1 sc, 2 sc in next st] 6 times. 18 sts
Rnd 4: [2 sc, 2 sc in next st] 6 times. 24 sts
Rnds 5-6: Sc around.
Change to CC4.
Rnd 7: Sc around.
Rnd 8: Working in FLO for whole round, [3 sc, 2 sc in next st] 6 times. 30 sts
Rnd 9: Working in FLO for whole round, sc around.
Rnd 10: Sc around, sl st in beg sc to join.
Fasten off. Weave in end. Fold Hat Brim out and up.

Hat Bobble
Stuff as you go.
Rnd 1: With CC4 and working into a magic ring, 6 sc. 6 sts
Rnd 2: 2 sc in each st around. 12 sts
Rnd 3: [1 sc, 2 sc in next st] 6 times. 18 sts
Rnd 4: Sc around.
Rnd 5: [1 sc, 1 sc2tog] 6 times. 12 sts
Rnd 6: 6 sc2tog. 6 sts
Fasten off. Leave a long yarn tail to sew the Hat Bobble to the Hat once you've made all the parts.

Scarf
Made in turned rows. Chains not included in the stitch count.
With CC3, chain 73.
Row 1: Starting in the second ch from the hook, 1 sc in each st down the chain. Turn. 72 sts
Rows 2-3: 1 ch, sc across.
Fasten off. Weave in ends.
Made in turned rows. Chains not included in the stitch count.
With CC3, chain 73.
Row 1: Starting in the second ch from the hook, 1 sc in each st down the chain. Turn. 72 sts
Rows 2-3: 1 ch, sc across.
Fasten off. Weave in ends.
Scarf Bobbles - make 2
Stuff as you go.
Rnd 1: With CC4 and working into a magic ring, 6 sc. 6 sts
Rnd 2: [1 sc, 2 sc in next st] 3 times. 9 sts
Rnds 3-4: Sc around.
Rnd 5: [1 sc, 1 sc2tog] 3 times. 6 sts
Fasten off. Weave the yarn tail through the FLO of the last 6 sts and pull to close hole. Leave a long yarn tail to sew the Scarf Bobbles to the Scarf once you've made all the parts.

|

|

|
Making Up
Using photographs as a guide, use tapestry needle and yarn tails to sew pieces tog, pinning in place first.
Using photographs as a guide, use tapestry needle and yarn tails to sew pieces tog, pinning in place first.
- Sew the stuffed Head to the wider end of the Body. The front edge of the join should be in line with Rnd 4 of the Body.
- Sew the Front Flippers to the bottom of the front of the Head - joining them on 2-3 rnds above the join between the Head and the Body and making sure they are both pointing outwards.
- Sew the Rear Flippers to the narrow end of the Body, about 4 rnds in from the last rnd of the Body, pointing outwards as in the photos.
- Sew the two Muzzle parts to the front of the Head, their bottom edge should sit approx 9 rnds up from where the Head and Body join.
- Sew the Nose in position on top of the Muzzle.
- Sew the Tusks, curving inwards, onto the bottom of the two Muzzle parts.
- Sew the Eyes in place just above the top edge of the Muzzle approx 3 stitches apart.
- Sew the Scarf Bobbles to the ends of the Scarf.
- Sew the Hat Bobble to the top of the Hat, stuff the Hat and sew it to the top of the Head, off set at an angle to one side.

|

|

|
Embroidered Details
With a length of the appropriate yarn and a tapestry needle, embroider the following:
With a length of the appropriate yarn and a tapestry needle, embroider the following:
- With CC1, The single stitch highlight on each Eye and the V stitches down the back of the Head and Body.
- With CC2, Walter's smile and 4 "claws" on each of the Front and Rear flippers.
- With CC4, two lines of running stitch down the Scarf.
Terms of Use
- I am happy for you to donate, gift or sell any of the my crochet chums you make if you are an individual crafter - please credit mycrochetchums.com as the designer.
- If you do wish to sell your my crochet chums, it is your responsibility to ensure that the finished item complies with the relevant toy legislation in your country.
- Please be sure to use toy grade stuffing and do not add buttons, bells, ribbons etc that could be a danger to small children.
- The patterns and all images are copyright protected and are not for commercial use. They cannot be sold, transmitted, distributed or reproduced in any form or by any means. I’ve worked hard to create the designs - please don’t sell my patterns - it’s just plain mean!
Want to sharpen your Ami making skills? Check out my Hints & Tips section - including these...


Love FREE patterns? Over 60 of mycrochetchums to make!
Prefer working from a free printable PDF*? Join the Chums Gang!
|
How it works...
The Chums Gang Mailing Listers can download Free PDFs for all my Free Patterns - many in a choice of UK or US Crochet terms - from an exclusive section of the website. You'll receive a link to the latest PDF by email before the pattern appears on the website - and can also access free printable PDFs of all the other free patterns from that link. I usually email every 2-3 weeks - when I've come up with a new pattern - don't worry, I won't spam you! You will be sent a Welcome email, usually within 24 hours - please check your Spam and please do email me [email protected] if nothing arrives. Gmail users may find the first email ends up in your Promotions tab - move that first one to your Primary tab and all future emails should go straight there. |
|
* Walter the Walrus is NOT available as a free PDF.
