
Oval Start Photo Tutorial
(or..."Why does this bit of the pattern start with a chain instead of a magic ring?)
(or..."Why does this bit of the pattern start with a chain instead of a magic ring?)

The Oval Start
When a designer wants a piece to start with an oval shape rather than a circle they have to use a different technique to the familiar start of working the first round into a Magic Ring - if you’ve not come across the method before it can be a bit bamboozling - so here’s a step by step photo tutorial to help. This instructions are written for Right Handed crochters.
The instructions for the first couple of rounds of an oval piece will look something like this:
With MC chain 4.
Rnd 1: Starting in 2nd chain from hook and rotating as you go, [3 dc, 2 ch] twice. 6 sts
Rnd 2: [3 dc, 3 dc in 2 ch sp] twice. 12 sts
Rnd 1: Starting in 2nd chain from hook and rotating as you go, [3 dc, 2 ch] twice. 6 sts
Rnd 2: [3 dc, 3 dc in 2 ch sp] twice. 12 sts
(These are actually the first two rounds of the head of my Little Bear with a Big heart - you can find the free amigurumi pattern for him HERE).
Let’s work through these instructions step by step…. starting with With MC chain 4
This is sometimes called a Foundation Chain - the number of stitches specified will depend on what sort of oval the designer wants to create, a long thin oval would need a Foundation Chain with more stitches, a short rounded one with less. In this case you only need to make a chain of 4 stitches - it should look something like the one in Fig 1 below:

Oval Start - Fig 1
The next bit of the pattern reads Rnd 1: Starting in 2nd chain from hook - this tells you that you will be working back down the chain - Fig 2 below shows the hook inserted in the "2nd chain from hook":

Oval Start - Fig 2
The next bit of Rnd 1 reads: and rotating as you go, [3 dc, 2 ch] twice. Don't worry about the "rotating as you go" bit for now - we'll get to that in a minute..work 1 dc in the stitch the hook is shown through in Fig 2 above and then 1 dc in each of the next 2 stitches down the chain - this is the "3dc". (Fig 3a below) , followed by 2 chains (Fig 3b below).

Oval Start - Fig 3a
|
Oval Start - Fig 3b
|
Now we need to deal with the "rotating as you go" - the important thing to remember is that this isn't the same as when you see "Turn" in a pattern - it just means you have to swivel the work round clockwise a bit so that you can work into the underside of the initial chain. The pattern reads "[3 dc, 2 ch] twice - you've already made one set of 3dc, 2ch, the "twice" tells you that you need to repeat those stitches again. You need to work 1 dc in the bottom of each of the three chains you worked the first three dc into. Fig 4a below left shows the hook going into the first of the chains to work the first dc, the other two will be worked into the two stitches immediately to the left of the hook -once done it will look like Fig 4b below right.

Oval Start - Fig 4a
|

Oval Start - Fig 4b
|
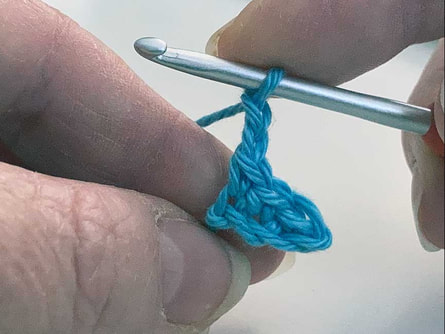
Then you need to make the 2 chain stitches - as shown in Fig 5 below - so now you have completed the instructions for the first round.

Oval Start - Fig 5
The chain stitches are not counted in the total stitch count for the round - which is why the count for Rnd 1 is "6sts" . This is often the case in crochet patterns - a good pattern (like mine 😉) will tell you in the pattern notes at the start if you should or shouldn't count them.
So that's Rnd 1 completed. Before you go any further, insert a stitch marker or piece of contrasting waste yarn (Fig 6), so that you know where Rnd 1 ends and Rnd 2 starts. I prefer to use the waste yarn as it's less fiddly than a plastic marker and you can see the end point of all the rounds as you work through the pattern, rather than just the last one.
So that's Rnd 1 completed. Before you go any further, insert a stitch marker or piece of contrasting waste yarn (Fig 6), so that you know where Rnd 1 ends and Rnd 2 starts. I prefer to use the waste yarn as it's less fiddly than a plastic marker and you can see the end point of all the rounds as you work through the pattern, rather than just the last one.

Oval Start - Fig 6
The instructions for Rnd 2 read: Rnd 2: [3 dc, 3 dc in 2 ch sp] twice. 12 sts so first you need to work 1 dc each into the next three stitches - (which are the first 3 dc you worked in Rnd 1). Fig 7 below shows the hook going into the first of those stitches, about to make the first dc of Rnd 2 and Fig 7b shows all three made.

Oval Start - Fig 7a
|

Oval Start - Fig 7b
|
The next instruction is 3 dc in 2 ch sp - do you remember in Rnd 1 when you had to do 2 chain stitches? That created what is known as a "chain space" or "ch-sp" - all this means is that you insert the hook under the chains from the previous Rnd into the gap they created - see Fig 8 - and in this case you're told to work 3 dc into the chain space - Fig 8b.

Oval Start - Fig 8a
|

Oval Start - Fig 8b
|
The instructions for Rnd 2 are in square brackets [3 dc, 3 dc in 2 ch sp] followed by the word twice - to let you know that you have to work those instructions two times over to complete the round - so you need to now work 1 dc in each of the next 3 stitches (Fig 9a) and 3 more dc into the second 2 chain space you created in Rnd 1 - Fig 9b.

Oval Start - Fig 9a
|

Oval Start - Fig 9b
|
That gives you a total of 12 sts, takes you back round to the stitch marker (Fig 10) and Rnd 2 is complete.
Oval Start - Fig 10.
You'll see now that those first two rounds have created an oval shape and that is why some pieces start with a chain rather than a magic ring!
Happy Crocheting! 😍🧶
Happy Crocheting! 😍🧶
