How to Use a Stitch Marker for Amigurumi
Photo Tutorial for using a scrap yarn stitch marker when crocheting continuous rounds
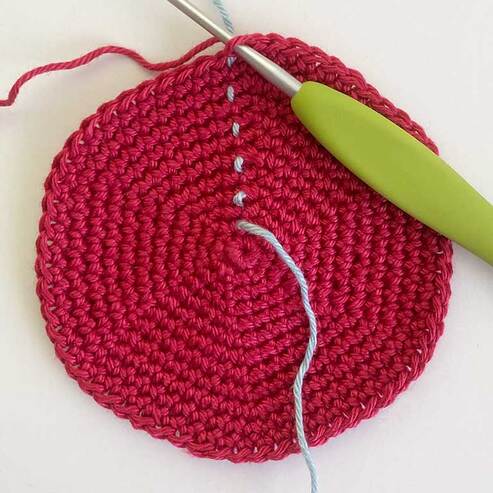
It's so easy to lose count of stitches and rounds when you're crocheting Amigurumi style in continuous rounds. I'm going to show you how to easily keep track by using a running stitch marker made from scrap yarn.
This tutorial explains:
This tutorial explains:
- What a stitch marker is used for in Amigurumi
- Why it's worth using a yarn stitch marker rather than a plastic one
- What to use as a scrap yarn stitch marker
- How to use a running stitch marker
Why use a Stitch Marker?
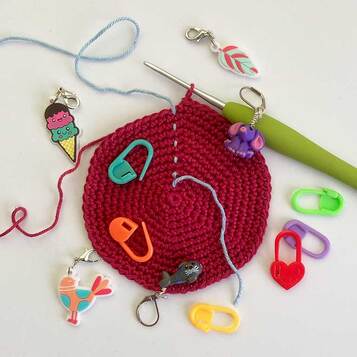
Stitch markers come in all shapes and sizes and are used in lots of ways when making Amigurumi - you may see "pm", meaning "place marker" in a pattern to mark where limbs or eyes should be attached for instance - but the main reason for using one is to keep track of the rounds worked so you know where you are in a pattern.
When crocheting Amigurumi style in continuous rounds, there's no seam, which means there's no way of telling where each round starts and finishes.
If the phone rings, or someone asks you if you fancy a cuppa mid-round and you lose track of how much of that round you've completed, if you have a stitch marker in place marking the end of the previous round, you can just pull out the stitches back to the marker and start that round again.
If you reach the end of a round in terms of the number of stitches you've counted in that round but you've not reached the stitch marker, you know you've made a mistake. Likewise, if you reach the stitch marker before you've worked all the stitches specified in a round you know something's wrong.
Why's a scrap yarn stitch marker better than a plastic one?
I'm not knocking plastic or metal markers, they're great for some jobs - if you do need to mark limb positions for instance, they're perfect - because they usually lock. They'll stay securely in place until you've completed the whole piece and are ready to join the limbs on.
It's also useful to have a locking stitch marker handy to hold the working loop of yarn if you have to put your crochet down mid way through a piece - at the end of each crochet session slip the loop that's on your hook, onto a locking stitch marker so your work can't unravel.
They're not so good for marking the start and finish of rounds - they can be annoyingly fiddly to move up after each round and stopping to do that every time can spoil the flow of your crocheting. If you're new to making Amigurumi, putting the hook and yarn down to move the marker every round can make for uneven tension.
If they're wider than your yarn they can also leave a row of noticeable gaps where they've been inserted, spoiling the look of the finished piece.
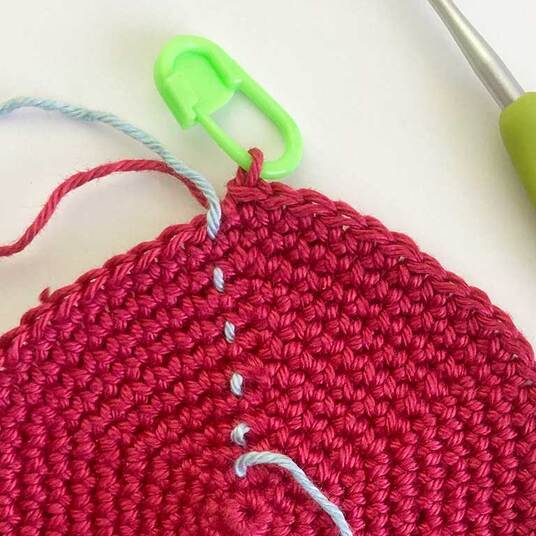
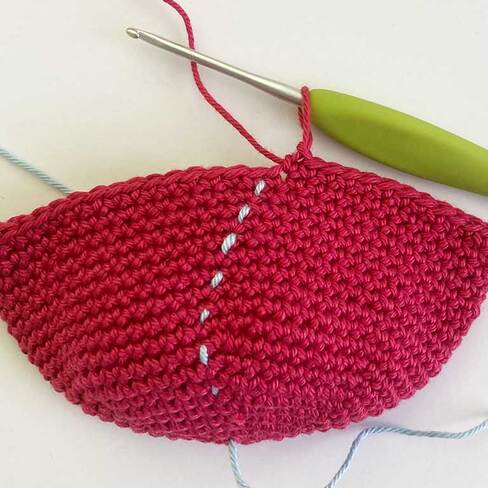
The big plus of using a scrap yarn stitch marker is that it stays in position until you've completed the whole piece, marking the end of every round, not just the last one. It's sometimes referred to as a "running stitch" marker as it creates a running row of stitches on your work.
Having the end of every round marked is useful if you notice a mistake several rounds back. If you've only got the end of the last round you worked marked with a plastic marker, you'll have to count every individual stitch back to where the error is, to work out the round it's in and where in that round it is.
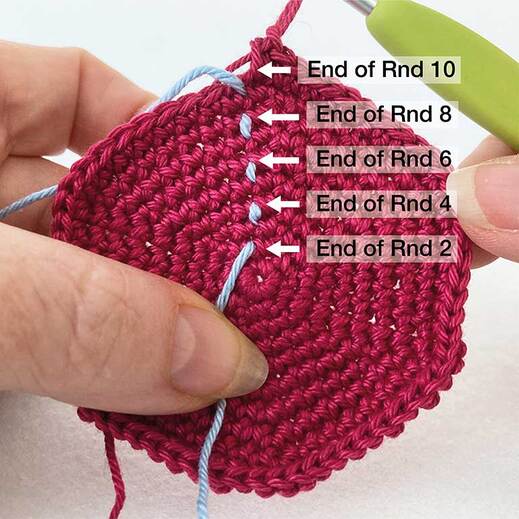
With the row of running stitches in place, you can quickly pull out the rounds back to the start of the round the mistake was in. You can easily count the rounds up the running marker from the start of the piece to work out where in the pattern you need to start working from again.
What to Use as a Running Stitch Marker
If you're desperate, any bit of yarn will do but if you have a choice…
- Yarn Length: Don't be mean with the length of the scrap yarn you use - use a length longer than the estimated height of the piece you're making - that way you'll have every round marked.
- Yarn Weight: Don't use yarn for the marker that's thicker than the yarn you're crocheting with - it'll leave a noticeable line of wider gaps when you pull it out. A yarn the same weight or lighter weight than your working yarn is best.
- Yarn Colour: Use a different colour yarn to the one you're crocheting with so you can easily see the marker - but don't go for one that's drastically contrasting. As you pull the stitch marker out once you've finished the piece it may shed fibres - if you use a black yarn for a marker on a white piece of work for instance those fibres can look like a dirty line running up your work. Use a light but different colour on a light piece of work and a dark but different colour on a dark one.
How to Use Scrap Yarn as a Stitch Marker
|
The tutorial is based on the following pattern - grab a hook and some yarn if you want to crochet along with me!
Rnd 1: Working into a magic ring, 6 dc, join. 6 sts Rnd 2: 2 dc in each st around, join. 12 sts Rnd 3: [1 dc, 2 dc in next st] 6 times, join. 18 sts Rnd 4: [2 dc, 2 dc in next st] 6 times, join. 24 sts Rnd 5: [3 dc, 2 dc in next st] 6 times, join. 30 sts Rnd 6: [4 dc, 2 dc in next st] 6 times, join. 36 sts Rnd 7: [5 dc, 2 dc in next st] 6 times, join. 42 sts Rnd 8: [6 dc, 2 dc in next st] 6 times, join. 48 sts Rnd 9: [7 dc, 2 dc in next st] 6 times, join. 54 sts Rnd 10: [8 dc, 2 dc in next st] 6 times, join. 60 sts Fasten off. This tutorial is written in UK Crochet terms - UK dc and US dc are not the same stitch- if you're used to working in US Terms, you'll need to work US sc - single crochet - wherever I refer to dc. Don't worry, I'll remind you as we go! |
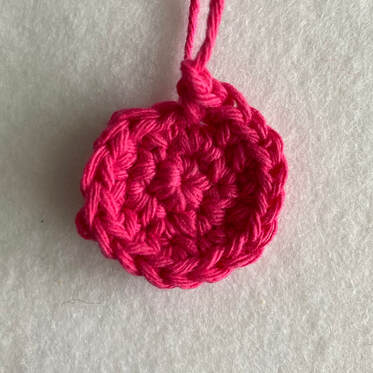
I recommend working the first two rounds of a piece before you insert the marker for the first time - it's a bit fiddly to put it in place after just the first round. The piece I'm working on in the photos below is increasing by 6 stitches per round, so at the end of Rnd 2 there are 12 stitches.
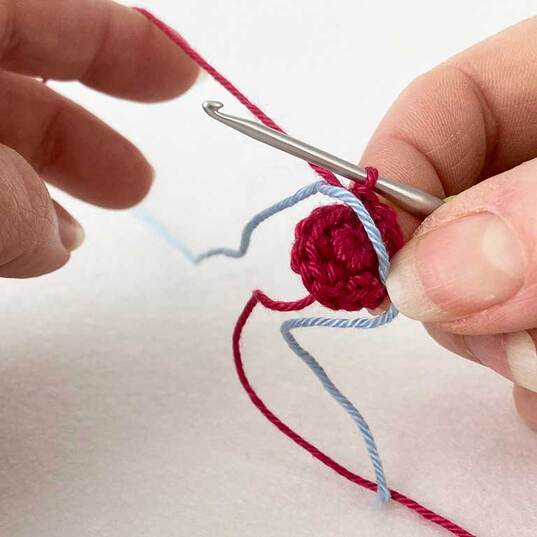
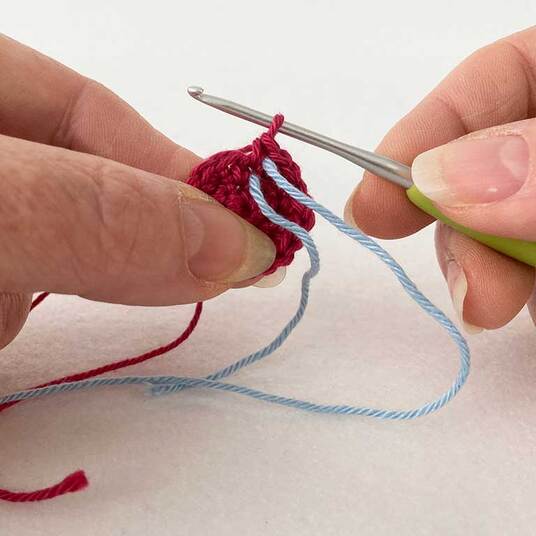
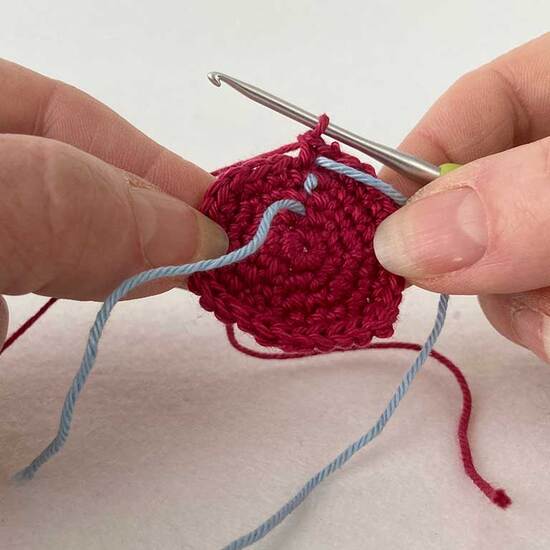
Lay the waste yarn across the work, with a short section of the waste yarn hanging down over the front of the work and the bulk of it trailing away from you behind the work. Where it passes over the work, it should be sitting immediately to the left of the last stitch of the second Rnd and the working yarn should be to the right of the waste yarn - if you're a right handed crocheter. (Fig 1)
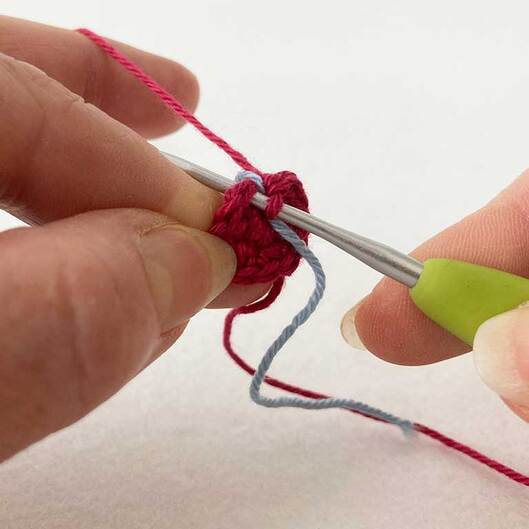
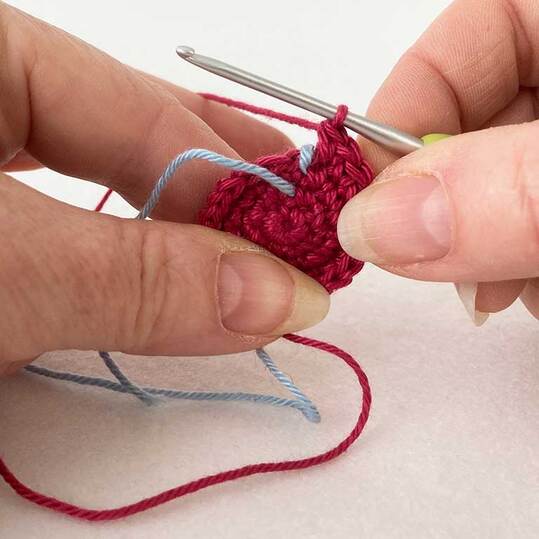
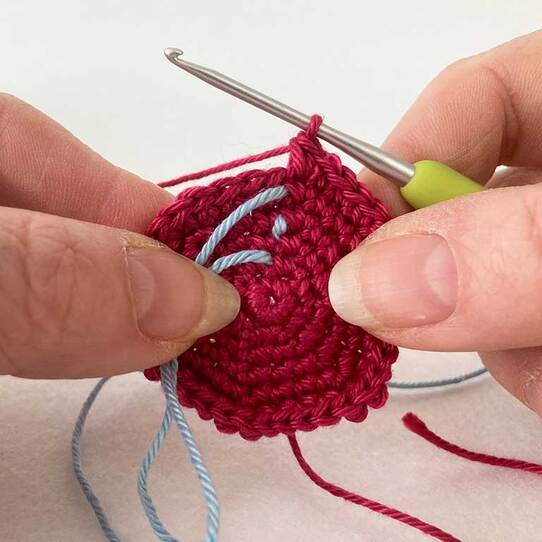
Insert the hook in the first stitch of the second Rnd (Fig 2) and work the first dc (US sc) of Rnd 3 as normal. The waste yarn will be trapped in place and the first stitch of Rnd 3 will be sitting to the left of it.
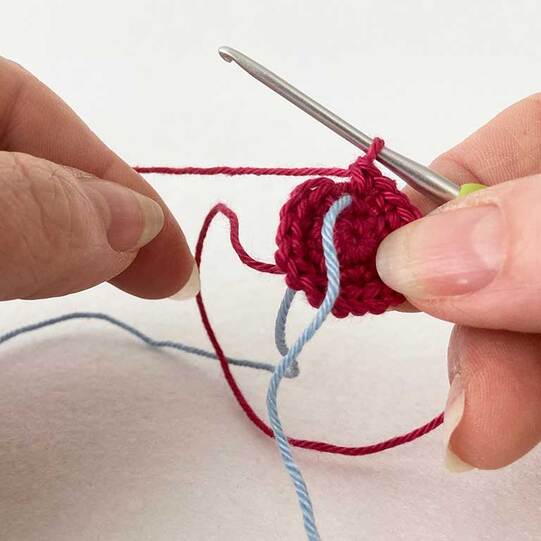
Continue to work Rnd 3 as directed in the pattern-in this case [1 dc, 2 dc in next st] 6 times. 18 sts. (Don't forget, that's all sc in US Terms).The last stitch of Rnd 3 will be worked into the last stitch of Rnd 2, immediately to the right of the waste yarn. (Fig 3)
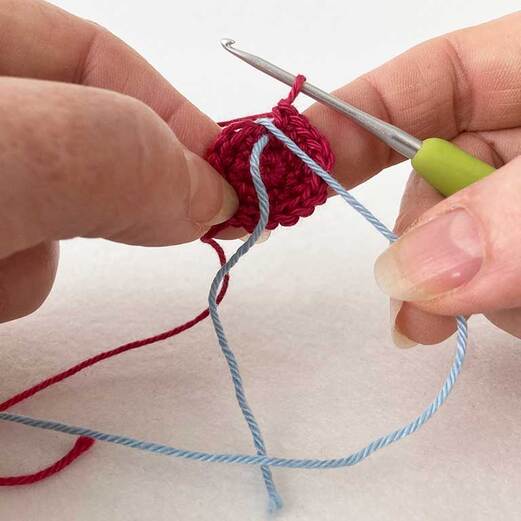
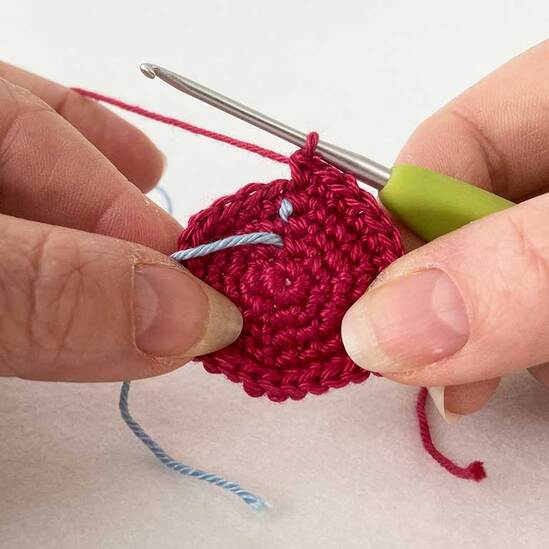
Flip the long end of the waste yarn over the work, towards you. Both tails of the waste yarn will now be facing you, on the right side of the work (Fig 4)
Work the first st of Rnd 4 into the first st of Rnd 3, trapping the waste yarn in place. (Fig 5)
Continue to work Rnd 4 as directed in the pattern - in this case [2 dc, 2 dc in next st] 6 times. 24 sts. (Don't forget, that's all sc in US Terms). The last stitch of Rnd 4 will be worked in the last stitch of Rnd 3.
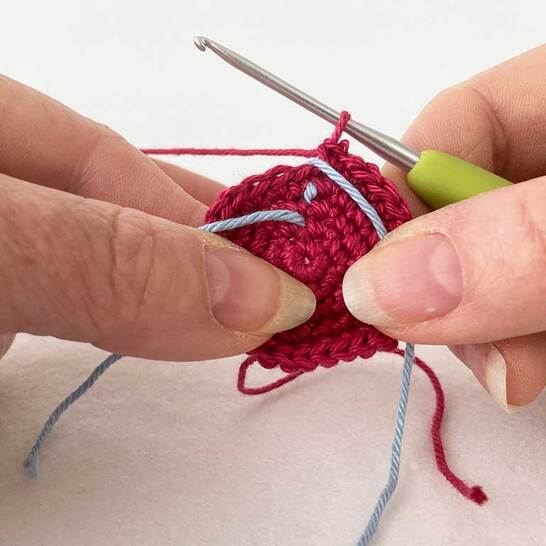
Flip the long end of the waste yarn back over the work away from you again. (Fig 6)
Flip the long end of the waste yarn back over the work away from you again. (Fig 6)
Work the first stitch of Rnd 5 into the first stitch of Rnd 4, over the waste yarn. Continue to work Rnd 5 as directed in the pattern-in this case [3 dc, 2 dc in next st] 6 times. 30 sts. (All sc in US Terms).The last stitch of Rnd 5 will be in the last stitch of Rnd 4 (Fig 7)
Work Rnd 5 - [4 dc, 2 dc in next st] 6 times. 36 sts. (All in sc if you're using US Terms). At the end of Rnd 5, flip the long end of the waste yarn back over the work towards you. (Fig 8) The first stitch of Rnd 6 will be worked over the marker. (Fig 9)
Work Rnd 6 - [5 dc, 2 dc in next st] 6 times. 42 sts (Don't forget, it's sc in US Terms) The last stitch of Rnd 6 will be in the last stitch of Rnd 5. (Fig 10)
Once again, flip the stitch marker over the work away from you. (Fig 11)
Carry on working the rounds and flipping the yarn back and forth over the work at the end of each round.
Continue on in same way for however many rounds there are in your pattern. At the end of EVEN numbered rounds the yarn will be flipped over the work AWAY from you. At the end of ODD numbered rounds the yarn will be flipped over the work TOWARDS you.
Top Tip: When you get to the end of a piece - don't pull the running stitch marker out straight away - it can be useful when you're sewing your Amigurumi together if the pattern tells you to join pieces in line with a certain round - you can count up the side of the marker quickly to find the right round.
And finally...
You may find that the running line of stitches created by the marker is diagonal when you're crocheting several rounds without increases- this is normal and comes about because, when crocheting in continuous rounds, the stitches do not sit directly on top of each other but are offset slightly to one side. If you're right handed the line will move diagonally to the right, if you're left handed, it will move to the left. Once the marker's removed you won't be able to see where the rounds end.
If you've found this tutorial helpful you may also like...

