How to Sew Amigurumi Crochet Parts Together
A guide to joining amigurumi parts together with a seamless join

Join Amigurumi Crochet like a pro!
Do you get frustrated when it comes to joining Amigurumi parts together?
How you attach the crocheted body parts makes a massive difference to the look of your finished creation - bad stitching can make for a lumpy, floppy, disappointing end result.
So many people tell me joining amigurumi pieces together is their least favourite part of the process. I used to be the same, but, having learnt this technique for creating a seamless join, the making up has become one of my favourite things.
This photo tutorial covers how to sew an open ended piece to a closed piece - the kind of join you're likely to do most often when making Amigurumi - without the stitches showing and giving a neat, professional finish.
I'll be talking you through it step by step.
These instructions are written for right handed crocheters. If you are a leftie, your work will be mirrored to my photos. Right handed crocheters will be working from right to left, left handed ones will work from left to right.
Let's dive in!

Fig 1 - thread the yarn tail onto a needle
You're going to use the long yarn tail on the open ended piece to do the sewing, so thread it onto a yarn needle (Fig 1). If you haven't left a long enough tail, thread up a yarn needle in the same colour yarn as you've used for the open piece and tie it onto the too-short yarn tail of the open piece close to the last stitch of the last round. Tuck the too-short tail out of the way inside the open piece.

Fig 2 - needle in from front to back
|

Fig 3 - pull the yarn right through
|
You need the working yarn to be on the inside of the open piece, so pass the needle through the first unused stitch (the first stitch of the last round you worked on the open piece) from the front to back (Fig 2). Pull the yarn up so that there isn't any loose yarn left on the outside of the piece (Fig 3).

Fig 4
You'll be using the yarn tail from the open piece to create the join, but I've swapped the yellow yarn tail for a red one just to make it easier for you to see what I'm doing (Fig 4).

Fig 5 - get stuffing!
|

Fig 6 - pin the parts together
|
Stuff the open piece - don't be mean with the filling, it'll compact down (Fig 5).
Pin the two pieces together (Fig 6), making sure the yarn tail is still coming out from the back of the open piece.

Fig 7 - making the first stitch
|

Fig 8 - pull the stitch up
|
Insert the needle into the closed piece directly above the stitch on the open piece that the working yarn is coming out from. Bring the needle out of the closed piece directly above the next stitch along on the open piece.
Pull the yarn through to complete the stitch (Fig 8). I'll be keeping my stitches quite loose to help you see what's going on. If you're just practising it's ok to keep your stitches loose too but if you're working on a finished piece, pull the yarn through to take up any slack so the two pieces are pulled snuggly together.
Pull the yarn through to complete the stitch (Fig 8). I'll be keeping my stitches quite loose to help you see what's going on. If you're just practising it's ok to keep your stitches loose too but if you're working on a finished piece, pull the yarn through to take up any slack so the two pieces are pulled snuggly together.

Fig 9 - bring the needle from the back to the front
|

Fig 10 - pull the yarn through
|
You're going to be sewing through each stitch of the last round on the open piece, so now insert the needle into the back of the next unworked stitch on the open piece and bring it out on the front (Fig 9).
Pull the yarn through to pull the two parts snuggly together - again your stitches will be a little tighter than mine (Fig 10).
Pull the yarn through to pull the two parts snuggly together - again your stitches will be a little tighter than mine (Fig 10).

Fig 11 - work back into the same place
|

Fig 12 - come out in line with the next stitch along on the open piece
|
This bit's important! Insert the needle into the SAME place on the closed piece that the yarn is coming out of from the previous stitch (Fig 11) and then bring it out again on the closed piece directly above the next stitch along on the open piece (Fig 12).

Fig 13 - insert needle in the back of the next stitch
|

Fig 14 - pull the yarn through, completing the stitch
|
Insert the needle into the back of that next unworked stitch and bring it out again on the front of the open piece (Fig 13).
Pull the yarn through so that the two pieces are pulled together snuggly - again, a little tighter than shown in my photos (Fig 14).
Pull the yarn through so that the two pieces are pulled together snuggly - again, a little tighter than shown in my photos (Fig 14).

Fig 15 - work back into top of previous stitch
|

Fig 16 - pull yarn through
|
Once again, insert the needle in the SAME place on the closed piece that the yarn is coming out of and bring it out again directly above the next unworked stitch along on the open piece (Fig 15).
Pull the yarn through so that the two pieces are pulled together snuggly (Fig 16).
Pull the yarn through so that the two pieces are pulled together snuggly (Fig 16).

Fig 17 - working from back to front again
|

Fig 18 - working into top of previous stitch
|
As with the previous stitch made, insert the needle into the back of the unworked stitch of the open piece and bring it out on the front (Fig 17).
Then, as with the previous steps, insert the needle in the last place on the closed piece that the yarn is coming out from and bring it out again directly above the next unworked stitch of the open piece (Fig 18).
Then, as with the previous steps, insert the needle in the last place on the closed piece that the yarn is coming out from and bring it out again directly above the next unworked stitch of the open piece (Fig 18).

Fig 19 - working from back to front again
|

Fig 20 - work into each stitch on the open piece
|
Insert the needle again into the back of the unworked stitch of the open piece and bring it out on the front (Fig 19).
You're going to carry on working right round the open piece - working into each stitch of the last round of the open piece. My stitches look quite obvious but yours, in the same colour as the open piece and pulled up snuggly will be much less visible (Fig 20)..
You're going to carry on working right round the open piece - working into each stitch of the last round of the open piece. My stitches look quite obvious but yours, in the same colour as the open piece and pulled up snuggly will be much less visible (Fig 20)..

Fig 21
|

Fig 22
|
Once you've worked all the way round, you'll reach the point where the working yarn is coming out of first stitch where you initially took your yarn tail from front to back in Step 2 (Fig 21).
Insert the needle into the stitch on the closed piece directly above that stitched then bring it out several rows above (Fig 22).
Insert the needle into the stitch on the closed piece directly above that stitched then bring it out several rows above (Fig 22).

Fig 23
To see how to securely fasten off and hide the end of the yarn tail, check out my photo tutorial HERE.

Fig 24
I've resewn the pieces together in Fig 24 above using the real yarn tail from the open piece and pulling the stitches up so the two parts sit snuggly together.
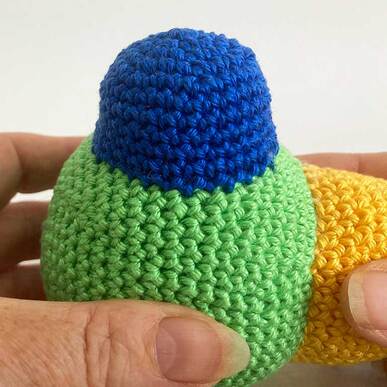
In this tutorial, to make the photos clear, I've joined the open and closed piece with the rounds of both lined up but this technique also works just as well when the rounds are not aligned - as with the blue part in Fig 25 below where the joining stitches going into the closed - green - piece are across several different rounds.
Use this technique to join limbs or a head to a body, or a muzzle onto a face. If you have naturally loose tension, you may find it is worth working the joining stitches round the last round of the open piece twice to strengthen the join.
My tutorial is based on a technique I learnt originally from the Planet June website for joining amigurumi- a brilliant resource for all sorts of techniques with lots of video tutorials - including many for left handed crocheters. You can find June's videos - left and right handed - for a seamless join at www.planetjune.com/join
You may also like...