How to Resize an Amigurumi Pattern
A guide to two easy ways to make Amigurumi larger or smaller
Just like there's more than one way to cook an egg, there's more than one way to resize an Amigurumi pattern. Googling how to enlarge or reduce them will bring up a myriad of different ways - some involving some brain freezing mathematical calculations to change the number of rounds and stitches.
I want to show you a couple of quick and easy ways to change the scale of your Amigurumi crochet makes without having to make any changes to a pattern.
I want to show you a couple of quick and easy ways to change the scale of your Amigurumi crochet makes without having to make any changes to a pattern.
Option 1: Change the yarn weight to make larger or smaller
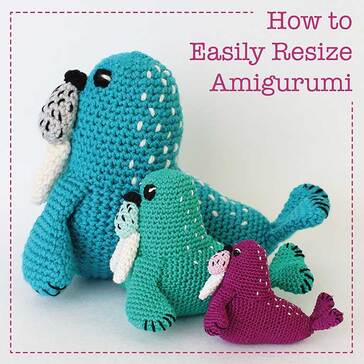
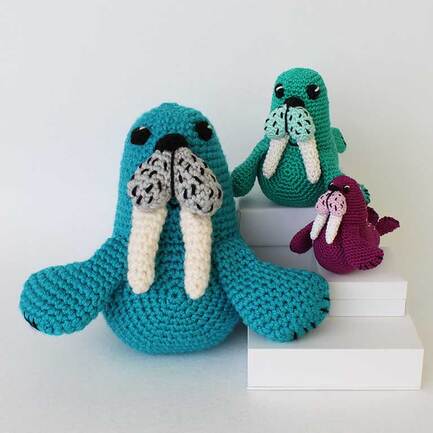
The trio of Walrus' above were all made from the same pattern but with different weight yarns. Each has exactly the same number of rounds and stitches.
Here's the basic principle (and it's not rocket science!):
Use a heavier (thicker) weight yarn than recommended in the pattern if you want to make a larger Ami.
Use a lighter (thinner) weight one than recommended to make a smaller one.
Here's the basic principle (and it's not rocket science!):
Use a heavier (thicker) weight yarn than recommended in the pattern if you want to make a larger Ami.
Use a lighter (thinner) weight one than recommended to make a smaller one.
The pattern for the Walrus was originally written for the medium sized green one in Fig 1 above. He was made using a 4 ply cotton, Scheepjes Catona (the US equivalent would be Fine, Sport or Baby weight).
The larger blue one was made with an acrylic Aran yarn, Scheepjes Chunky Monkey (the US equivalent would be Medium, Worsted or Afghan weight).
For the smallest, purple one, I used a 2 ply cotton, Scheepjes Sweet Treat (equivalent to a Lace weight yarn in the US).
If you'd like to make your own Walrus, you can find the free pattern HERE.
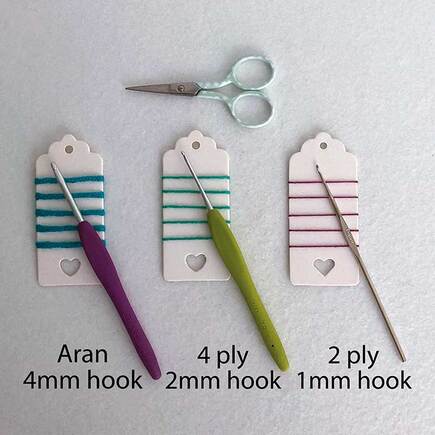
You'll see from Fig 2 above that I also increased and decreased the hook size - you'll need to experiment but you're aiming for a hook that crochets the yarn up without big gaps between the stitches - you don't want the stuffing showing through!
The medium green Walrus was made using a 2 mm hook, as specified in the original pattern for a 4 ply yarn. I used a 4mm hook with the chunky yarn to make the biggest Walrus and went down to a 1mm hook for the smallest one.
If you used the original 2mm hook with the finer yarn you'd find the stitches were very loose and didn't sit snuggly enough together to stop the stuffing showing through.
If you used a thick, chunky yarn with the original 2mm hook you'd find it hard to pick up the yarn to pull it through when making the stitches and the whole thing would be very tight to work.
While the principle itself is pretty straightforward, it's not an exact science - you'll need to experiment, different crocheters may get varying results as we all have a different natural tension.
If you do decide to experiment - don't assume that a smaller amigurumi will be faster to make. Of the three, the chunky Walrus was the quickest - and most fun- to make.
The smallest one took the longest, it was fiddly and I had to crochet slower than usual to make sure I didn't split the yarn with the hook. I also had to user a magnifier throughout to see where to insert the hook for the next stitch (but then I do have middle-aged eyes!).
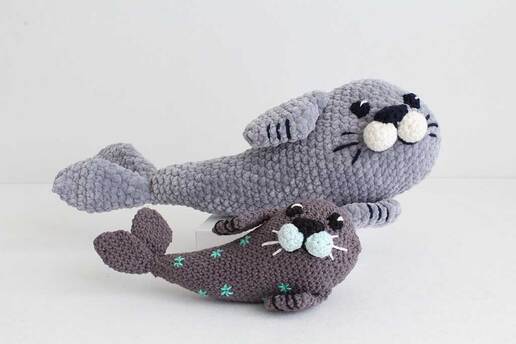
Fig 3 above shows another example of changing the size of an Amigurumi pattern by experimenting with a different weight yarn.
The small seal was made with a DK (US equivalent: Light) cotton on a 3mm hook. The larger one was made with a chunky (US: Bulky) Velvet/Chenille yarn on a 4.5mm hook using the same pattern.
If you'd like to make your own Seal, you can find the pattern HERE
Knowing that you can scale a pattern up or down like this is great for using up spare yarn in your stash or if you fall in love with a particular yarn out shopping, (we've all done it!) but don't have a pattern to hand that's written specifically for that weight.
If you're relatively new to amigurumi making I'd recommend only scaling up to a chunkier yarn to start with, save working with a thinner yarn until you've had more practice - it's harder to keep track of the stitches and easy to mis-insert the hook.
Option 2: Use two strands of yarn to make an Amigurumi larger
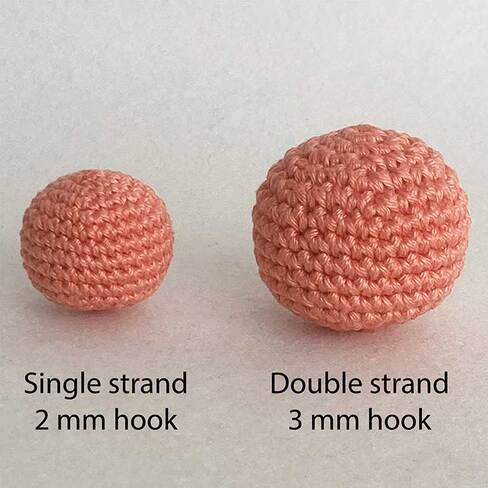
The second way to easily scale up a pattern is to use the yarn weight specified in the pattern but work with two strands instead of one.
Both balls in Fig 5 above were made using Scheepjes Catona 4 ply cotton.
Again, you'll need to increase the hook size to be able to pick up the yarn on the end of the hook as you make the stitches.
Don't assume though that double up the yarn strands necessarily means doubling the hook size. I tried a 4mm hook initially to make the larger ball with two strands but I quickly found the gaps between the stitches were too big and so the stuffing showed through.
I found a 3mm hook was much better, large enough to hold 2 strands of yarn as I pulled through to make the stitches but giving a tight enough finish to conceal the stuffing. It's another case of trial and error to see what works for you and your particular yarn.
Using the same yarn and doubling it up is a fab way to make a "Mum and Baby" pair of amigurumi from one pattern.
And finally...
The best thing with both these techniques is to get your hook out and have a go - find out what works for you! Why not pick one of my free patterns and try changing the size?
Happy Crocheting!
Happy Crocheting!

