Crochet Christmas Wreath - How to join Neck and Head

All of the characters have the same basic Head and Neck. The Neck sits at the base of the Head. It's barely seen, but it's important, as it serves as a support for the character's scarf or collar.
Sewing the Neck to the Head is straightforward - I just wanted to show you where it should sit as it's not obvious from the pictures of the completed characters.
Sewing the Neck to the Head is straightforward - I just wanted to show you where it should sit as it's not obvious from the pictures of the completed characters.

Fig 1
Before you start, you need to fill the "bowl" shape of the Neck piece with stuffing - Fig 1.
|

Fig 2
Pin the stuffed Neck piece to the base of the Head, centred on it. Anchor it in place with a single pin in the centre and then swivel it until its oval shape lines up with the ovals created by the rounds of the Head - Fig 2.
|

Fig 3
Insert Pins all the way round the side of the Neck - Fig 3 - it's important to make sure than the side of the Neck stays upright when pinning, don't let it spread out - if it does splay wider than its base, the overall circumference of the neck will be wider and you may find that the collar on the Elf and Santa will then be too short to reach all the way round and on the other characters, the scarves will be shorter once they're knotted round the Neck.
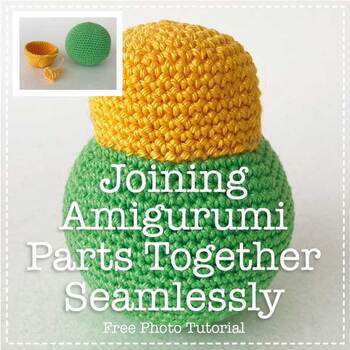
Once you're happy with the positioning, you can stitch the Neck into place, but before you do, check out the tutorial below for how to sew Amigurumi Parts together seamlessly - it makes a huge difference to the final finish!
Once you're happy with the positioning, you can stitch the Neck into place, but before you do, check out the tutorial below for how to sew Amigurumi Parts together seamlessly - it makes a huge difference to the final finish!