
Amigurumi Toes Photo Tutorial

How to create Amigurumi Toes - using a simple method.
It’s all about the finishing touches with Ami - little things like creating simple toes make all the difference. This step by step photo tutorial takes you through an easy method that can be applied to all sorts of creatures.
It might look complicated at first but I've broken it down into basic steps - once you've worked through the sequence once or twice you'll easily be able to do it on future projects.
I’ve used contrasting yarn for the photos so you can easily see the process- you’ll need to use the same colour yarn as your Ami's feet are made of.
The same technique can also be used to create "fingers" on hands.
You’ll also need a yarn needle, scissors and pins.
In the picture above, the pair of feet in the middle have claws as well as toes - you make the toes first then add the claws - you can find a Photo Tutorial for creating Claws HERE.
Let's get started!

Ami Toes - Fig 1
|

Ami Toes - Fig 2
|
Step 1: With the upper front of the foot facing you, insert four pins evenly spaced as shown in Fig 1 - these mark where the top of each stitch creating the toes will be.
Step 2: Tip the foot up so that the underside is facing you and insert four more evenly spaced pins in the upper half of the base of the foot as shown in Fig 2- these mark where the bottom of each stitch creating the toes will be.
Take notice of the letters labelling the pins in Figs 1 & 2 - these are used in the following instructions to indicate where the needle should pass through the foot.

Ami Toes - Fig 3
|

Ami Toes - Fig 4
|
Step 3: With a length of yarn and a yarn needle, (remember to use yarn that matches the foot colour), insert the needle to one side of the foot and bring it out at point A on the top side of the foot. (Fig 3)
Step 4: Insert the needle in the underside of the foot at point E and bring it back out at point A again. (Fig 4)
Step 4: Insert the needle in the underside of the foot at point E and bring it back out at point A again. (Fig 4)

Ami Toes - Fig 5
|

Ami Toes - Fig 6
|
Step 5: Pull the yarn gently to tighten so that it starts to compress the foot. (Fig 5)
Step 6: Insert the needle in the underside of the foot at point E again and bring it back out at point B. (Fig 6)
Step 6: Insert the needle in the underside of the foot at point E again and bring it back out at point B. (Fig 6)

Ami Toes - Fig 7
|

Ami Toes - Fig 8
|
Step 7: Pull the yarn gently to tighten, compressing the foot further. (Fig 7)
Step 8: Insert the needle in the underside of the foot at point F and bring it back out at point B again. (Fig 8)
Step 8: Insert the needle in the underside of the foot at point F and bring it back out at point B again. (Fig 8)

Ami Toes - Fig 9
|

Ami Toes - Fig 10
|
Step 9: Pull the yarn gently to tighten to compress the foot further - this creates the first toe shape. (Fig 9)
Step 10: Insert the needle in the underside of the foot at point F again and bring it back out at point C. (Fig 10)
Step 10: Insert the needle in the underside of the foot at point F again and bring it back out at point C. (Fig 10)

Ami Toes - Fig 11
|

Ami Toes - Fig 12
|
Step 11: Insert the needle in the underside of the foot at point G and bring it back out again at point C. (Fig 11)
Step 12: Pull the yarn up gently to compress the foot to start creating the second toe shape. (Fig 12)
Step 12: Pull the yarn up gently to compress the foot to start creating the second toe shape. (Fig 12)

Ami Toes - Fig 13
|

Ami Toes - Fig 14
|
Step 13: Insert the needle in the underside of the foot at point G again and bring it back out at point D. (Fig 13)
Step 14: Insert the needle in the underside of the foot at point H and bring it out again at point D. (Fig 14)
Step 14: Insert the needle in the underside of the foot at point H and bring it out again at point D. (Fig 14)

Ami Toes - Fig 15
|

Ami Toes - Fig 16
|
Step 15: Pull the yarn up to compress the foot further, starting to create the third toe shape. (Fig 15)
Step 16: Insert the needle in the underside of the foot at point H again, take it through the bottom of the foot and bring it out in exactly the same place as you first inserted the yarn in the beginning. (Fig 16)
It’s very important to make sure that the needle comes out in exactly the same place as it was first inserted as you will be knotting the two ends together to fasten off and pulling the knot back into the foot in the following steps - you won’t be able to do this if the yarn ends come out of the foot at different points.

Ami Toes - Fig 17
|

Ami Toes - Fig 18
|
Step 17: Pull the yarn tight to finish creating the third toe shape. (Fig 17)
Step 18: Tie the two yarn ends together in a double knot. (Fig 18)
Step 18: Tie the two yarn ends together in a double knot. (Fig 18)

Ami Toes - Fig 19
|

Ami Toes - Fig 20
|
Step 19: Snip the excess yarn tails off about 1cm away from the knot. (Fig 19)
Step 20: You will now have a knot with two short ends sitting on the outside of the foot - in the next steps you will pull this knot back into the foot. (Fig 20)
Step 20: You will now have a knot with two short ends sitting on the outside of the foot - in the next steps you will pull this knot back into the foot. (Fig 20)
|
|
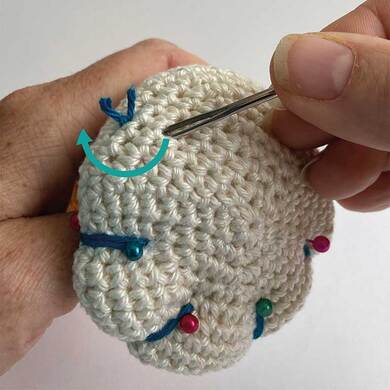
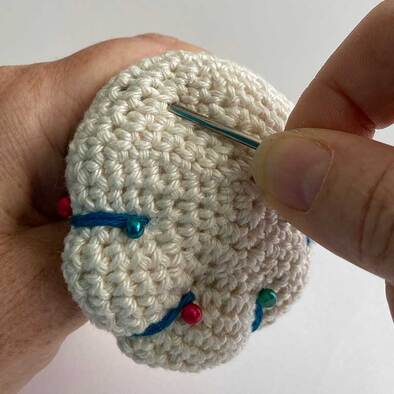
Step 21: Insert the wrong end of your yarn needle to the side of the knot and swivel it in the direction of the arrow so that it catches on the yarn inside the foot and drags the knot under the surface. (Fig 21 and 22)
Step 22: Remove the pins - your toe shapes are now complete. (Figs 23 and 24)
Step 22: Remove the pins - your toe shapes are now complete. (Figs 23 and 24)

Ami Toes - Fig 23
|

Ami Toes - Fig 24
|
Your toes will of course be created using the same yarn that you've used to make the foot (Fig 25) - if you'd like to know how to add embroidered Claws, check out the photo tutorial HERE.

Ami Toes - Fig 25
