
|
Want to start working in the round to make amigurumi but completely put off by that “impossible” magic ring?
Don’t panic - I’ve got you. First off, if you’re a newbie crocheter you don’t HAVE to do a magic ring - you can simply create a starting ring by making a chain of 4 stitches, slip stitching into the first chain to make a closed circle and then working the first round of stitches into the centre of that circle. Easy huh? So, why not just do that? Why bother with that pesky Magic Ring at all? Well the problem is, if you start with a chained circle, you always end up with a hole in the middle - there’s no way to tighten it up - and that spoils the look of your ami, you might not mind it at first but the more you get into making ami, I promise you, that hole will really start to bug you! The big benefit of mastering a Magic Ring is that you can pull it up super tight and VOILA! ….no hole! Have a look at the images below to see the difference…
So how do you make one? Well there are actually lots of different methods out there - check out You Tube, Pinterest, Insta - there’s loads of different ways, you just have to find the one that works for you.
If you’d like to see a photo tutorial of the way that works for me, click HERE. There’s lots of photos and a detailed description talking you through every step, which will look a bit daunting at first but it’s just a slow motion description of a technique that in the end will only take a couple of seconds to do and will be satisfying every time you do it! I think it’s easier to pick up from a photo tutorial than a video - I find with a video by the time I’ve managed to copy the first bit, I’ve missed the next bit and spend half my time putting the crochet down, scrolling the video back then having to get yarn, hook and hands back into the position they were when I left off - it just doesn’t work for me. A series of photos can’t race ahead of my hands like a video so I find them much easier to follow. Even with photos to follow it can take a bit of practice to get the knack but you will get there. Try to think of it like when you learnt to ride a bike as a kid…..you couldn’t get it, kept wobbling, couldn’t steer, couldn’t get both feet off the ground, then suddenly…. you got it and were flying along, no looking back! Same with a Magic Ring, once you’ve got it, you’ve got it and in no time you’ll be doing it with your eyes closed!
Find my Magic Ring Photo Tutorial HERE.
0 Comments

Four is for Flamingo!
Hello again from the Isle of Wight. Real life and Christmas preparations got in the way of crocheting for a week or so but I’ve managed to find the time to write up another pattern in my #lockdownamichallenge …..may I introduce to you my flamboyant Flamingo!
He’s made with yarn from the Aldi Amigurumi Yarn Box that is the basis of my challenge to see how many different #mycrochetchums I can design and create from the whole box. If you’d like to have a go at making my Flamingo, you can find the free amigurumi pattern here.

The Aldi Box - 36 gorgeous hues!
The yarn is DK weight - so you can use up yarn already in your stash on any of the #lockdownamichallenge patterns - I do recommend Cotton though as it's usually firm enough to give your ami a good structure and stop them being floppy!
This is the second Flamingo I’ve designed - I was lucky enough to have a different, larger one called Frankie commissioned by Crochet Now magazine - he appeared in the September issue (Issue 60) of the magazine. The Crochet Now Editor, Jenny, was kind enough to take a chance on me as a newbie, unpublished designer and I’m so grateful to her for doing so as it gave me the confidence to start letting #mycrochetchums loose on the world!

Blog - Frankie Issue 60
The Crochet Now magazine and website are packed with great patterns and inspiration not to mention some lovely giveaways - I recommend you check them out.
Flamingo is the fourth of the #mycrochetchums I’ve come up with so far - here he is with the rest of the gang - you can find the free amigurumi patterns for all of them here.

Blog - the first four!
The next of #mycrochetchums off the hook will be making their entrance in the New Year - I hope you all have a Happy, Hooky (and Safe) Christmas and get lots of time to crochet!
Greetings from the Isle of Wight on a thankfully bright and sunny Sunday morning!
Today’s the day I’m letting loose into the world the third of #mycrochetchums in my #lockdownamichallenge - here he is, the cheeky monkey……. 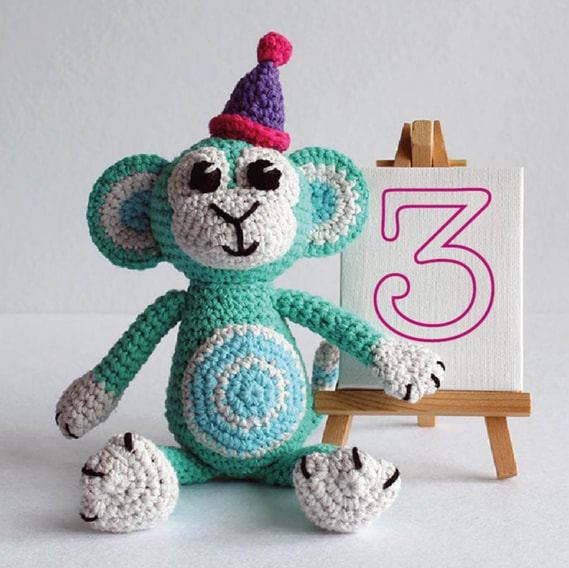
If you’d like to make him, you can find the free amigurumi pattern here.
The Teal he’s made with is one of my favourite colours - as the Aldi Amigurumi Yarn Box has so many gorgeous bright colours in I’ve decided my crochet chums can be whatever colour I fancy - this is my own rainbow world I’m creating…and if a monkey wants to wear a party hat, in my world he can!
Thank you to everyone in the various FB groups and on Instagram who have liked and commented on the characters so far - I really do appreciate your support and encouragement.
If you’d like to follow me on Social Media, I have a FB Page and an Instagram one both called “mycrochetchums”. I’m new to Instagram and slowly getting my head round how it works - I’ll get there in the end…. 4 weeks ago I wouldn’t have thought I’d be creating my own website but I’ve managed to do that so anything’s possible! Happy Crocheting! |
AuthorI'm Pia and I'm an Amigurumi Addict! ArchivesApril 2021 Categories RSS Feed RSS Feed
|
- home
- Free Patterns
- SHOP
-
Hints & Tips
- Christmas Wreath Hints & Tips >
- Embroidering an Amigurumi Smile
- Sewing together seamlessly tutorial
- Hiding Yarn Tails Photo Tutorial
- Resizing an Amigurumi Pattern
- Assembling Amigurumi Using Pin Lines
- Perfect Stripes Photo Tutorial
- Scrap Yarn Stitch Marker Photo Tutorial
- Checking Tension/Gauge
- UK Abbreviations
- US Abbreviations
- UK/US Crochet Terms
- Oval Start Photo Tutorial
- Bendable Knee for Amigurumi Photo Tutorial
- Magic Ring Photo Tutorial
- Amigurumi Toes Photo Tutorial
- Ami Claws Photo Tutorial
- About
- Contact Me
- FAQs
- T&Cs Privacy


Powered by  Create your own unique website with customizable templates.
 Create your own unique website with customizable templates.