
Free Amigurumi Crochet Halloween Pattern
Pumpkin, Bat & Monster

Crochet your own Spooky Decorations!
Yarn
COL A: Pale Peach
COL B: Red
COL C: Orange
COL D: Purple
COL E: Green
COL F: White
COL G: Black
COL H: Grey
Small amounts of each colour required. Each character needs approx 30g-40g of 4 ply cotton. I used Scheepjes Catona on a 2mm hook.
Scheepjes Catona. 100% Cotton. 125m per 50g
A cotton yarn works well for Ami as it gives good stitch definition and creates a firm structure so body parts hold their shape well. Scheepjes Catona is a relatively thick 4 ply (US: Sport) - you can substitute a DK Cotton (US: DK/Light Worsted) with a similar amount of metres per 50g.
You can scale this pattern up or down by altering the yarn and hook. Use a heavier weight yarn and larger hook for a bigger Goose and a lighter weight yarn and smaller hook for a little one.
To read more about scaling an Amigurumi pattern up or down, check out my guide HERE
Hook
2 mm - for the yarn specified above.
2 mm - for the yarn specified above.
Other Supplies
Yarn needle, toy stuffing, stitch marker/waste yarn, pins and scissors.
Yarn needle, toy stuffing, stitch marker/waste yarn, pins and scissors.
Tension
27 st x 30 rows = 10 cm measured over UK dc using 2mm hook with Scheepjes Catona 4 ply cotton.
Tension is not critical for this project but stitches should be tight enough to avoid stuffing showing through.
27 st x 30 rows = 10 cm measured over UK dc using 2mm hook with Scheepjes Catona 4 ply cotton.
Tension is not critical for this project but stitches should be tight enough to avoid stuffing showing through.
Size
11-12 cm (4.5 in) approx from top to toe plus any hats.
11-12 cm (4.5 in) approx from top to toe plus any hats.
Pattern Notes
Unless otherwise specified these patterns are worked in the amigurumi style, in a continuous spiral without slip stitching or turning chains.
Use a stitch marker or waste yarn to keep track of the first stitch of each round. You can find a Photo Tutorial about using waste yarn as a stitch marker HERE.
If you don't want to make a Magic Ring you can start each piece by making a chain of 2 and then work the first round into the second chain from the hook.
If you'd like to start with a Magic Ring but don’t know how, you can find a Photo Tutorial HERE.
The characters are made of multiple separate pieces sewn together. Unless otherwise stated, finish each piece by pulling the yarn through the last loop and leave a long tail for sewing. Any loose tails at the end can be easily woven in.
The characters share some common basic parts. The patterns for these are shown first. Please refer to the sections for the individual characters for colours etc.
Making Up Guide
Using the photographs as a guide, pin the pieces together before sewing, checking from all angles to make sure you’re happy with the positioning, then use the long yarn tails or a length of yarn with a yarn needle to stitch the pieces together.
There's a Photo Tutorial about sewing Amigurumi parts together seamlessly, you can find it HERE.
Before you start positioning the pieces, you may find it helpful to insert a line of pins running down the front centre line of the Body, taking them under the base and up the back - this will help you to position everything else evenly in relation to the central line. Remove any pins that are in the way of the pieces you are attaching as you go.
There's a Photo Tutorial about using Pin Lines to help position amigurumi parts, you can find it HERE.
Instructions specific to making up the individual characters are at the end of each of the patterns.
UK Crochet Terms - Abbreviations
This pattern is written using UK Crochet Terms - they are NOT the same as US ones - please familiarise yourself with the UK terms to avoid your character’s shape distorting!
The “dc” abbreviation used in this pattern refers to UK double crochet. The equivalent stitch in US terms is single crochet - if you are used to US patterns you need to work single crochet everywhere this pattern says “dc”. If you work US dc (equivalent to UK Treble) the finished item will be elongated and the stuffing will show through.
This pattern also uses UK tr - treble crochet, the equivalent US stitch is US dc - double crochet and it uses UK htr - half treble crochet, the equivalent US stitch is US hdc - half double crochet.
If you are used to working in US Crochet Terms you can find a conversion chart HERE.
If you are unfamiliar with any of the terms used in this pattern, you can find a chart of the UK Crochet terms used HERE.
Increasing and decreasing
You may use either standard increases and decreases in this pattern or, for a much neater finish, invisible ones. FLO = Front loop only.
Decrease - "dc2tog" in pattern.
Invisible decrease: Insert hook in FLO of the two stitches to be decreased, yrh, pull through both front loops, yrh, draw through two loops on hook.
Increase - "2 dc in next st" in pattern.
Invisible Increase: Work 1 dc in FLO of next st and 1 dc in both loops of same st.
Basic Parts
Basic Head
Made from bottom up. Stuff as you go.
Rnd 1: With chosen colour and working into a magic ring, 6 dc. 6 sts
Rnd 2: 2 dc in each st around. 12 sts
Rnd 3: [1 dc, 2 dc in next st] 6 times. 18 sts
Rnd 4: [2 dc, 2 dc in next st] 6 times. 24 sts
Rnd 5: [3 dc, 2 dc in next st] 6 times. 30 sts
Rnd 6: [4 dc, 2 dc in next st] 6 times. 36 sts
Rnd 7: [5 dc, 2 dc in next st] 6 times. 42 sts
Rnds 8-12: Dc around.
Rnd 13: [5 dc, 1 dc2tog] 6 times. 36 sts
Rnd 14: [4 dc, 1 dc2tog] 6 times. 30 sts
Rnd 15: [3 dc, 1 dc2tog] 6 times. 24 sts
Rnd 16: [2 dc, 1 dc2tog] 6 times. 18 sts
Rnd 17: [1 dc, 1 dc2tog] 6 times. 12 sts
Rnd 18: 6 dc2tog. 6 sts
Fasten off. Weave yarn tail through FLO of rem 6 sts and pull to close hole. Weave in end.
Basic Body
Made from bottom up. Stuff as you go.
Rnd 1: With chosen colour and working into a magic ring, 6 dc. 6 sts
Rnd 2: 2 dc in each st around. 12 sts
Rnd 3: [1 dc, 2 dc in next st] 6 times. 18 sts
Rnd 4: [2 dc, 2 dc in next st] 6 times. 24 sts
Rnd 5: [3 dc, 2 dc in next st] 6 times. 30 sts
Rnd 6: [4 dc, 2 dc in next st] 6 times. 36 sts
Rnd 7: [4 dc, 1 dc2tog] 6 times. 30 sts
Rnds 8-10: Dc around.
Rnd 11: [3 dc, 1 dc2tog] 6 times. 24 sts
Rnds 12-14: Dc around.
Rnd 15: [2 dc, 1 dc2tog] 6 times. 18 sts
Rnds 16-17: Dc around.
Fasten off. Leave a long yarn tail to sew the Body to the Head once you've made all the parts.
Basic Arms - make 2
Worked from bottom up. Stuff as you go.
Rnd 1: With chosen colour and working into a magic ring, 6 dc. 6 sts
Rnds 2-3: Dc around.
Change to second chosen colour.
Rnd 4: [2 dc, 2 dc in next st] twice. 8 sts
Rnds 5-6: Dc around.
Rnd 7: [2 dc, 1 dc2tog] twice. 6 sts
Rnds 8-9: Dc around.
Rnd 10: [1 dc, 1 dc2tog[] twice. 4 sts
Fasten off. Leave a long yarn tail to sew the Arm to the Body once you've made all the parts.
Basic Feet - make 2
Worked from front to back. Do not stuff.
Rnd 1: With chosen colour and working into a magic ring, 6 dc. 6 sts
Rnds 2-5: Dc around.
Rnd 6: [1 dc, 1 dc2tog] twice. 4 sts
Fasten off. Leave a long yarn tail to sew the Feet to the Body once you've made all the parts.
Worked from front to back. Do not stuff.
Rnd 1: With chosen colour and working into a magic ring, 6 dc. 6 sts
Rnds 2-5: Dc around.
Rnd 6: [1 dc, 1 dc2tog] twice. 4 sts
Fasten off. Leave a long yarn tail to sew the Feet to the Body once you've made all the parts.
Basic Eyes - make 2
Rnd 1: With COL G and working into a magic ring, 4 dc, sl st in beg dc to join. 4 sts
Fasten off. Leave a long yarn tail to sew the Eyes to the Head once you've made all the parts.
Rnd 1: With COL G and working into a magic ring, 4 dc, sl st in beg dc to join. 4 sts
Fasten off. Leave a long yarn tail to sew the Eyes to the Head once you've made all the parts.
Pattern 1: Pumpkin

Pumpkin - front
Basic Parts to Make
Make Basic Head in COL A.
Make Basic Arms, starting with COL A, changing to COL C.
Make Basic Feet in COL C.
Make Basic Eyes in COL G.
Make Basic Head in COL A.
Make Basic Arms, starting with COL A, changing to COL C.
Make Basic Feet in COL C.
Make Basic Eyes in COL G.
Pumpkin's Body
Made from the bottom up. Stuff as you go.
Rnds 1-6: With COL C, as pattern for Basic Body.
Rnd 6: [5 dc, 2 dc in next st] 6 times. 42 sts
Rnds 8-15: Dc around.
Rnd 16: [5 dc, 1 dc2tog] 6 times. 36 sts
Rnd 17: [4 dc, 1 dc2tog] 6 times. 30 sts
Rnd 18: [3 dc, 1 dc2tog] 6 times. 24 sts
Rnd 19: [2 dc, 1 dc2tog] 6 times. 18 sts
Fasten off. Leave a long yarn tail to sew the Body to the Head once you've made all the parts.

Pumpkin- right side
|

Pumpkin - left side
|
Pumpkin's Hat
Made as three parts - the Hat Base, Stalk and Leaf.
Hat Base
Rnd 1: With COL C and working into a magic ring, 6 dc. 6 sts
Rnd 2: 2 dc in each st around. 12 sts
Rnd 3: [1 dc, 2 dc in next st] 6 times. 18 sts
Rnd 4: [2 dc, 2 dc in next st] 6 times. 24 sts
Rnd 5: [3 dc, 2 dc in next st] 6 times. 30 sts
Rnd 6: 30 sl st in FLO.
Fasten off. Leave a long yarn tail to sew the Hat Base to the Head once you've made all the parts.
Stalk
Do not stuff.
Rnd 1: With COL E and working into a magic ring, 6 dc. 6 sts
Rnd 2: Dc around in BLO.
Rnd 3: [1 dc, 1 dc2tog] twice. 4 sts
Rnd 4: Dc around.
Fasten off. Leave a long yarn tail to sew the Stalk to the Hat Base once you've made all the parts.
Leaf
With COL E, chain 8.
Row 1: Starting in second chain from hook, *1 sl st, 1 dc, 1 hdc, 2 tr in next st, 1 hdc, 1 dc, 1 sl st**, rotating as you go, work * to ** again down the other side of the chain. 16 sts
Fasten off. Weave in starting tail. Leave a long finishing tail to sew the Leaf to the Hat Base once you've made all the parts.

Pumpkin - back
|

Pumpkin - base
|
Pumpkin's Ears - make 2
Do not stuff.
Rnd 1: With COL A and working into magic ring, 6 dc. 6 sts
Rnd 2: [1 dc, 2 dc in next st] 3 times. 9 sts
Fasten off. Leave a long yarn tail to sew the Ears to the Head once you've made all the parts. Flatten the Ear in half.
Do not stuff.
Rnd 1: With COL A and working into magic ring, 6 dc. 6 sts
Rnd 2: [1 dc, 2 dc in next st] 3 times. 9 sts
Fasten off. Leave a long yarn tail to sew the Ears to the Head once you've made all the parts. Flatten the Ear in half.
Pumpkin's Collar
With COL E, chain 30.
Row 1: Starting in second chain from hook, 1 sl st, 1 dc, 1 htr, 1 tr, miss 2 sts, 1 sl st, *5ch, starting in second ch from hook, 1 sl st, 1 dc, 1 htr, 1 tr, miss 2 sts, 1 sl st **; rep from * to ** six more times.
Fasten off. Leave a long yarn tail to sew the Collar to the Body once you've made all the parts.

Pumpkin - hat detail
|

Pumpkin - face detail
|
Pumpkin- Making Up
Sew the Body in place on the bottom of the Head.
Sew Arms in place either side of Body.
Sew Feet in place on base of Body.
Sew Eyes in place on Head, sitting approx 5 stitches apart.
Sew Ears in place either side of Head.
Sew Hat Base in place on top of Head, sitting at an angle to one side.
Sew Stalk to centre of top of Hat Base.
Sew Leaf to base of Stalk.
Sew Collar to top of Body.

Pumpkin - body detail
Pumpkin- Embroidered Detail
Using the photos as a guide, with a yarn needle, embroider the following:
With COL A, the Nose.
With COL G, the Mouth on the Head and the Eyes, Nose and Mouth on the front of the Body.
With COL F, the single stitch highlight on each Eye.
Using the photos as a guide, with a yarn needle, embroider the following:
With COL A, the Nose.
With COL G, the Mouth on the Head and the Eyes, Nose and Mouth on the front of the Body.
With COL F, the single stitch highlight on each Eye.
Pattern Two: Bat

Bat - front
Basic Parts to Make
Make Basic Head in COL A.
Make Basic Body in COL D.
Make Basic Feet in COL D.
Make Basic Eyes in COL G.
Make Basic Head in COL A.
Make Basic Body in COL D.
Make Basic Feet in COL D.
Make Basic Eyes in COL G.
Bat's Hood
Worked from back to front. Do not stuff.
Rnd 1: With COL D and working into a magic ring, 6 dc. 6 sts
Rnd 2: 2 dc in each st around. 12 sts
Rnd 3: [1 dc, 2 dc in next st] 6 times. 18 sts
Rnd 4: [2 dc, 2 dc in next st] 6 times. 24 sts
Rnd 5: [3 dc, 2 dc in next st] 6 times. 30 sts
Rnd 6: [4 dc, 2 dc in next st] 6 times. 36 sts
Rnds 7-13: Dc around.
Rnd 14: [4 dc, 1 dc2tog] 6 times. 30 sts
Fasten off. Leave a long yarn tail to sew the Hood to the Head once you've made all the parts.

Bat - right side
|

Bat - left side
|
Bat's Wings - make 2
Do not stuff.
Rnd 1: With COL D and working into a magic ring, 6 dc. 6 sts
Rnd 2: 2 dc in each st around. 12 sts
Rnd 3: [1 dc, 2 dc in next st] 6 times. 18 sts
Rnd 4: Dc around.
Rnd 5: [2 dc, 2 dc in next st] 6 times. 24 sts
Rnd 6: Dc around.
Rnd 7: [3 dc, 2 dc in next st] 6 times. 30 sts
Rnd 8: [2 sl st, miss next st, 5 dc in next st, miss next st] 6 times, sl st in beg st to join. 42 sts
Fasten off. Flatten the Wing in half, lining up the scallop shapes from the last round. Use the yarn tail to sew the open edge of the wing closed. Weave in end.
Bat's Ears - make 2
Worked from top down. Do not stuff.
Rnd 1: With COL D and working into a magic ring, 4 dc. 4 sts
Rnd 2: [1 dc, 2 dc in next st] twice. 6 sts
Rnd 3: Dc around.
Rnd 4: [2 dc, 2 dc in next st] twice. 8 sts
Fasten off. Leave a long yarn tail to sew the Ears to the Hood once you've made all the parts.
Worked from top down. Do not stuff.
Rnd 1: With COL D and working into a magic ring, 4 dc. 4 sts
Rnd 2: [1 dc, 2 dc in next st] twice. 6 sts
Rnd 3: Dc around.
Rnd 4: [2 dc, 2 dc in next st] twice. 8 sts
Fasten off. Leave a long yarn tail to sew the Ears to the Hood once you've made all the parts.

Bat - back detail
|

Bat - base detail
|
Bat - Making Up
Insert the Head into the Hood and sew around the edge of the Hood to secure in place.
Sew the Body in place on the bottom of the Head/Hood.
Sew Feet in place on base of Body.
Sew Eyes in place on Head, sitting approx 6 stitches apart.
Sew Ears in place on top of Head/Hood sitting approx 7 sts apart.
Sew Wings in place on back of Body, roughly in line with Rnd 12 of Body, sitting approx 4 sts apart.

Bat - belly detail
|

Bat - ear detail
|
Bat - Embroidered Details
Using the photos as a guide, with a yarn needle, embroider the following:
With COL A, the Bat's nose.
With COL B, the Bat's Hair, the V stitches on his chest and the line detail on the back of the Wings.
With COL G, the Mouth.
With COL F, the single stitch highlight on each Eye.
Using the photos as a guide, with a yarn needle, embroider the following:
With COL A, the Bat's nose.
With COL B, the Bat's Hair, the V stitches on his chest and the line detail on the back of the Wings.
With COL G, the Mouth.
With COL F, the single stitch highlight on each Eye.
Pattern Three: Monster

Basic Parts to Make
Make Basic Arms, starting with COL E, changing to COL B.
Make Basic Feet in COL E.
Make Basic Eyes in COL G.
Make Basic Arms, starting with COL E, changing to COL B.
Make Basic Feet in COL E.
Make Basic Eyes in COL G.
Monster's Head
Worked from the bottom up. Stuff as you go.
Rnds 1-14: With COL E, as for Basic head Pattern.
Change to COL G.
Rnds 15-17: Dc around.
Rnd 18: [4 dc, 2 dc in next st] 6 times. 36 sts
Rnd 19: [1 dc, 1 dc2tog] 12 times. 24 sts
Rnd 20: [2 dc, 1 dc2tog] 6 times. 18 sts
Rnd 21: [1 dc, 1 dc2tog] 6 times. 12 sts
Rnd 22: 6 dc2tog. 6 sts
Fasten off. Weave in end.
Monster's Body
Made from the bottom up. Stuff as you go.
Rnds 1-9: With COL G, as for Basic Body pattern.
Change to COL B.
Rnds 10-17: As for Basic Body pattern but do not fasten off at the end of Rnd 17.
Change to COL E.
Rnd 18: Dc around in BLO.
Rnd 19: Dc around.
Fasten off. Leave a long yarn tail to sew the Body to the Head when you've made all the parts.

Monster - front right
|

Monster - left side
|
Monster's Ears - make 2
Do not stuff.
Rnd 1: With COL E and working into magic ring, 6 dc. 6 sts
Rnd 2: [1 dc, 2 dc in next st] 3 times. 9 sts
Fasten off. Leave a long yarn tail to sew the Ears to the Head once you've made all the parts. Flatten the Ear in half.
Do not stuff.
Rnd 1: With COL E and working into magic ring, 6 dc. 6 sts
Rnd 2: [1 dc, 2 dc in next st] 3 times. 9 sts
Fasten off. Leave a long yarn tail to sew the Ears to the Head once you've made all the parts. Flatten the Ear in half.
Monster's Neck Bolt - make 2
Made in two separate pieces (it doesn't go all the way through!). Worked from the neck end outwards. Do not stuff.
Rnd 1: With COL H and working into a magic ring, 4 dc. 4 sts
Rnd 2: Dc around in BLO.
Rnd 3: Dc around.
Rnd 4: 2 dc in each st around in FLO. 8 sts
Rnd 5: Dc around in BLO.
Fasten off. Weave the yarn tail through BLO of last 8 sts and pull to close hole. Weave in end.
Monster's Jumper Trim
With COL B, chain 36.
Row 1: Starting in second chain from hook, *1 sl st, 3 ch, starting in second chain from hook, 1 sl st, 1 dc , miss next st; rep from * 16 more times, finish with sl st in first chain.
Fasten off. Leave a long yarn tail to sew the Jumper Trim to the Body once you've made all the parts.

Monster - back
|

Monster - base
|
Monster - making up
Sew the Body onto the bottom of the Head.
Sew Ears in place on either side of Head.
Sew Eyes in place approx 5 stitches apart.
Sew Neck Bolt pieces in place on either side of the Neck.
Sew Arms in place either side of Body, sitting just below the Neck Bolt pieces.
Sew Feet in place on base of Body.
Sew the Jumper Trim in place.

Monster - face detail
Monster - Embroidered Details
Using the photos as a guide, with a yarn needle, embroider the following:
With COL E, the Monster's nose.
With COL B, the scar across the Monster's forehead.
With COL G, the Mouth.
With COL F, the single stitch highlight on each Eye.
Using the photos as a guide, with a yarn needle, embroider the following:
With COL E, the Monster's nose.
With COL B, the scar across the Monster's forehead.
With COL G, the Mouth.
With COL F, the single stitch highlight on each Eye.
Terms of Use
I am happy for you to donate, gift or sell any of the my crochet chums you make if you are an individual crafter - please credit mycrochetchums.com as the designer.
If you do wish to sell your my crochet chums, it is your responsibility to ensure that the finished item complies with the relevant toy legislation in your country.
Please be sure to use toy grade stuffing and do not add buttons, bells, ribbons etc that could be a danger to small children.
The patterns are copyright protected and are not for commercial use. They cannot be sold, transmitted, distributed or reproduced in any form or by any means. I’ve worked hard to create the designs - please don’t sell my patterns - it’s just plain mean!
About mycrochetchums
I started mycrochetchums at the end of 2020 to give me something to focus on during lockdown and to make creative use of a box of Amigurumi Yarn that was an impulse purchase I was feeling guilty about!
I’m loving creating these cute characters and sharpening my tech skills in the process as I wrangle with managing a website and social media.
Check out the mycrochetchums Facebook page - drop me a message there if you have any feedback about the pattern or would like to share a picture of the end result.
You can also find me on Instagram @mycrochetchums.
If you have any questions about any of my patterns (or any other ami you may be working on) please email me at: [email protected] - I’ll do my best to help!
Happy Crocheting!
Pia x
©2022PIA SIMPSON/ MYCROCHETCHUMS
More spooky makes for you...
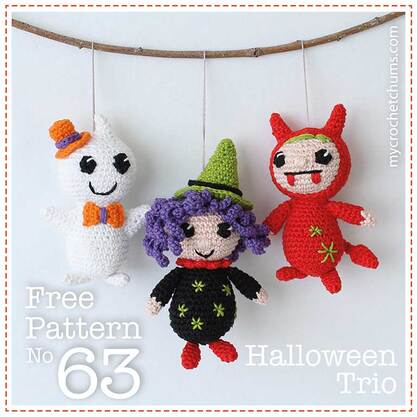
Halloween Trio
