
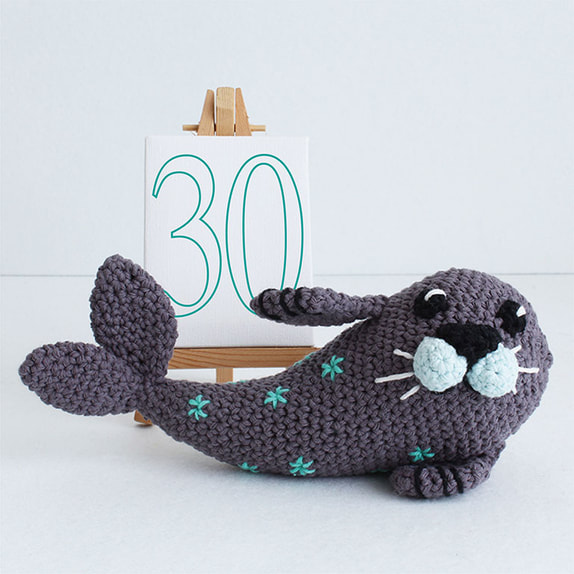
#lockdownamichallenge - No 30 - Seal
Scroll down for more pictures!
Yarn
Aldi So Crafty Knit & Purl Amigurumi Yarn - described on the box as "Light" - Equivalent to DK.
40g approx of Dark Grey (MC) for Body, Flippers and Tail.
10g approx of Pale Blue (CC1) for Snout.
10g approx of Black (CC2) for Eyes, Nose and embroidered details.
10g approx of Aqua (CC3) for embroidered stars.
Small amount of White (CC4) for Eye highlight and whiskers.
100% Cotton 25g = 57.5m
A cotton yarn works well for Ami as it gives good stitch definition and creates a firm structure so body parts hold their shape well. Any cotton/cotton mix DK should give similar results.
Hook
3 mm
Tension
Tension is not critical for this project but stitches should be tight enough to avoid stuffing showing through.
Tension is not critical for this project but stitches should be tight enough to avoid stuffing showing through.
Other Supplies
Yarn needle, toy stuffing, stitch marker/waste yarn.
Yarn needle, toy stuffing, stitch marker/waste yarn.
Size
Approx 21cm (8in) long.
Approx 21cm (8in) long.
Pattern Notes
Unless otherwise specified this pattern is worked in the amigurumi style, in a continuous spiral without slip stitching or turning chains.
Use a stitch marker or waste yarn to keep track of the first stitch of each round.
If you do not want to make a Magic Ring you can start each piece by making a chain of 2 and then work the first round into the second chain from the hook.
If you would like to start with a Magic Ring but don’t know how, you can find a Photo Tutorial HERE.
The Seal is made of multiple separate pieces sewn together. Unless otherwise stated, finish each piece by pulling the yarn through the last loop and leave a long tail for sewing. Any loose tails at the end can be easily woven in.
Increasing and decreasing
The “invisible” techniques below are recommended to give your amigurumi a neat finish:
Invisible Increase (2 dc in next st): Work 1 dc in FLO of next st and 1 dc in both loops of same st.
Invisible decrease (dc2tog): Insert hook in FLO of the two stitches to be decreased, yrh, pull through both front loops, yrh, draw through two loops on hook.
UK Crochet Terms - Abbreviations
This pattern is written using UK Crochet Terms - they are NOT the same as US ones - please familiarise yourself with the UK terms to avoid your character’s shape distorting!
The “dc” abbreviation used in this pattern refers to UK double crochet. The equivalent stitch in US terms is single crochet - if you are used to US patterns you need to work single crochet everywhere this pattern says “dc”. If you work US dc (equivalent to UK Treble) the finished item will be elongated and the stuffing will show through.
If you are used to working in US Crochet Terms you can find a conversion chart HERE.
If you are unfamiliar with any of the terms used in this pattern, you can find a chart of the UK Crochet terms used HERE.
If you are unfamiliar with any of the terms used in this pattern, you can find a chart of the UK Crochet terms used HERE.

Seal back Tail
|

Seal Head Front
|
Body
Stuff as you go. Worked from tail end up to head.
Rnd 1: With MC and working in a magic ring, 6 dc. 6 sts
Rnd 2: Dc around.
Rnd 3: [2 dc in next st] 3 times, 3 dc. 9 sts
Rnd 4: Dc around.
Rnd 5: 1 dc, [2 dc in the next st] 3 times, 5 dc. 12 sts
Rnd 6: Dc around.
Rnd 7: 2 dc, [2dc in next st] 3 times, 7 dc. 15 sts
Rnd 8: Dc around.
Rnd 9: 3 dc, [2 dc in next st] 3 times, 9 dc. 18 sts
Rnd 10: Dc around.
Rnd 11: 4 dc, [2 dc in next st] 3 times, 11 dc. 21 sts
Rnd 12: Dc around.
Rnd 13: 5 dc, {2 dc in next st] 3 times, 13 dc. 24 sts
Rnd 14: Dc around.
Rnd 15: 6 dc, [2 dc in next st] 3 times, 15 dc. 27 sts
Rnd 16: Dc around.
Rnd 17: 7 dc, [2 dc in next st] 3 times, 17 dc. 30 sts
Rnd 18: Dc around.
Rnd 19: 8 dc, [2 dc in next st] 3 times, 19 dc. 33 sts
Rnd 20: Dc around.
Rnd 21: 9 dc, [2 dc in next st] 3 times, 21 dc. 36 sts
Rnd 22: Dc around.
Rnd 23: 10 dc, [2 dc in next st] 3 times, 23 dc. 39 sts
Rnd 24: Dc around.
Rnd 25: 11 dc, [2 dc in next st] 3 times, 25 dc. 42 sts
Rnds 26-27: Dc around.
Rnd 28: 14 dc, [2 dc in next st] 3 times, 25 dc. 45 sts
Rnd 29: Dc around.
Rnd 30: 15 dc, [2 dc in next st] 3 times, 27 dc. 48 sts
Rnd 31: Dc around.
Rnd 32: [6 dc, 1 dc2tog] 6 times. 42 sts
Rnd 33: Dc around.
Rnd 34: [5 dc, 1 dc2tof] 6 times. 36 sts
Rnd 35: Dc around.
Rnd 36: [4 dc, 1 dc2tog] 6 times. 30 sts
Rnd 37: Dc around.
Rnd 38: [3 dc, 1 dc2tog] 6 times. 24 sts
Rnd 39: Dc around.
Rnd 40: [2 dc, 1 dc2tog] 6 times. 18 sts
Rnd 41: [1 dc, 1 dc2tog] 6 times. 12 sts
Rnd 42: 6 dc2tog. 6 sts
Fasten off. Weave in end.
Flipper - make 2
Rnd 1: With MC and working into a magic ring, 6 dc. 6 sts
Rnd 2: [1 dc, 2 dc in next st] 3 times. 9 sts
Rnd 3: [2 dc, 2 dc in next st] 3 times. 12 sts
Rnds 4-5: Dc around.
Rnd 6: [2 dc in next st] 3 times, 9 dc. 15 sts
Rnd 7: Dc around.
Rnd 8: 1 dc, 3 dc2tog, 8 dc. 12 sts
Rnd 9: 1 dc, 3 dc2tog, 5 dc. 9 sts
Rnd 10: 2 dc2tog, 5 dc. 7 sts
Rnd 11: Dc around.
Fasten off.
Tail - make 2
Rnd 1: With MC and working into a magic ring, 6 dc. 6 sts
Rnd 2: 2 dc in next st, 5 dc. 7 sts
Rnd 3: 2 dc in next st, 6 dc. 8 sts
Rnd 4: [2 dc in next st, 3 dc] twice. 10 sts
Rnd 5: [2 dc in next st, 4 dc] twice. 12 sts
Rnd 6: [2 dc in next st, 5 dc] twice. 14 sts
Rnds 7-9: Dc around.
Rnd 10: [1 dc2tog, 3 dc, 1 dc2tog] twice. 10 sts
Rnd 11: Dc around.
Rnd 12: [1 dc2tog, 1 dc, 1 dc2tog] twice. 6 sts
Fasten off.
Snout - make 2
Rnd 1: With CC1 and working into a magic ring, 6 dc. 6 sts
Rnd 2: [1 dc, 2 dc in next st] 3 times. 9 sts
Rnds 3-4: Dc around.
Fasten off.
Rnd 1: With CC1 and working into a magic ring, 6 dc. 6 sts
Rnd 2: [1 dc, 2 dc in next st] 3 times. 9 sts
Rnds 3-4: Dc around.
Fasten off.
Nose
Rnd 1: With CC2 and working into a magic ring, 6 dc. 6 sts
Rnd 2: [1 dc, 2 dc in next st] 3 times. 9 sts
Rnd 3: Dc around.
Fasten off.
Rnd 1: With CC2 and working into a magic ring, 6 dc. 6 sts
Rnd 2: [1 dc, 2 dc in next st] 3 times. 9 sts
Rnd 3: Dc around.
Fasten off.
Eye - make 2
Rnd 1: With CC2 and working into a magic ring, 4 dc, join with sl st into beg dc. 4 sts
Fasten off.
Rnd 1: With CC2 and working into a magic ring, 4 dc, join with sl st into beg dc. 4 sts
Fasten off.

Seal Back
|

Seal Side
|
Making Up
Using the photographs as a guide, pin the pieces together first, checking from all angles to make sure you’re happy with the positioning, then use the long yarn tails or a length of yarn with a yarn needle to stitch the pieces together.
With the Body sitting so the tail end of it is turned upwards, sew the Eyes in place on the side of the body at an angle, spacing them about 5 rows apart.
Centred on the Eyes, sew the two stuffed parts of the Snout in place, butted up close together.
Fold the Nose in half and stitch the last round closed. Sew the Nose in place just above the Snout, stitching the top edge to the Body and the sides to the Snout.
Sew the lower Flipper in place approx 12 rows down from the top of the Head - the smoother, curved edge of the flipper should be facing towards the back of the body.
Sew the upper Flipper in place approx 18 rows down from the top of the Head, again the smoother curved edge of the flipper should face towards the back of the body.
Sew the two parts of the Tail to the narrow end of the Body angled upwards.

Seal Flipper detail
|

Seal Face detail
|
Embroidered Details
Using the photos as a guide, use CC2 to embroider the claw detail on the two Flippers.
Use CC4 to sew the single stitch highlight on the Eyes and to embroider the whiskers either side of the Snout.
Use CC5 to embroider stars on the lower part of the Body.
All done!
Using the photos as a guide, use CC2 to embroider the claw detail on the two Flippers.
Use CC4 to sew the single stitch highlight on the Eyes and to embroider the whiskers either side of the Snout.
Use CC5 to embroider stars on the lower part of the Body.
All done!
Terms of Use
I am happy for you to donate, gift or sell any of the my crochet chums you make if you are an individual crafter - please credit mycrochetchums.com as the designer.
If you do wish to sell your my crochet chums, it is your responsibility to ensure that the finished item complies with the relevant toy legislation in your country.
Please be sure to use toy grade stuffing and do not add buttons, bells, ribbons etc that could be a danger to small children.
The patterns are copyright protected and are not for commercial use. They cannot be sold, transmitted, distributed or reproduced in any form or by any means. I’ve worked hard to create the designs - please don’t sell my patterns - it’s just plain mean!
About mycrochetchums
I started mycrochetchums at the end of 2020 to give me something to focus on during lockdown and to make creative use of a box of Aldi Amigurumi Yarn that was an impulse purchase I was feeling guilty about!
I’m loving creating these cute characters and sharpening my tech skills in the process as I wrangle with managing a website and social media.
Check out the mycrochetchums Facebook page - drop me a message there if you have any feedback about the pattern or would like to share a picture of the end result.
You can also find me on Instagram @mycrochetchums.
If you have any questions about any of my patterns (or any other ami you may be working on) please email me at: [email protected] - I’ll do my best to help!
Happy Crocheting!
Pia x
©PIA SIMPSON/ MYCROCHETCHUMS 2021
