
Free Amigurumi Crochet
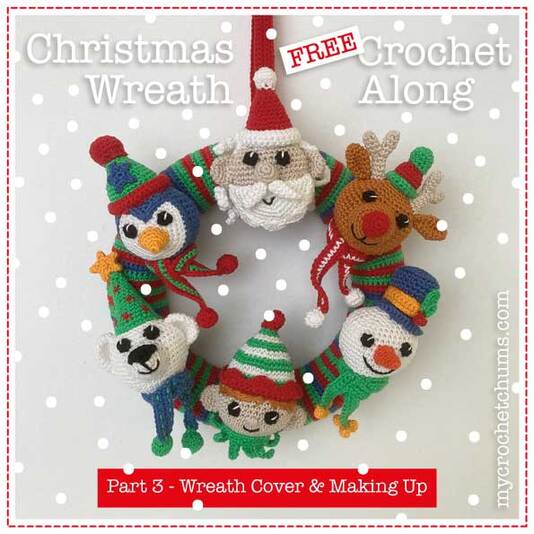
Christmas Wreath Pattern
Part 3 of the Christmas Wreath Crochet Along
Looking for the patterns for the characters?

To complete the Wreath, you will need:
- The 6 character heads made in Parts 1 & 2 of the Crochet Along.
- A 25cm diameter polystyrene craft ring like the one shown at the top of the next page.
- Enough Yarn of your choice to cover the ring. I used the same yarn that I'd used for the Heads - Scheepjes Catona Cotton 4 ply- with a 2mm hook and used around 100g of yarn in total to cover the ring. You could use just one colour or use up lots of odds and ends from your yarn stash. The amount you need may be slightly more or less than I used, depending on the yarn thickness and your natural tension when crocheting.
- Yarn needle, pins and scissors.

25cm dia polystyrene craft ring
Tension
27 st x 30 rows = 10 cm measured over UK dc using 2mm hook with Scheepjes Catona 4 ply cotton.
Tension is not critical for this project but stitches should be tight enough to avoid the polystyrene ring showing through.
27 st x 30 rows = 10 cm measured over UK dc using 2mm hook with Scheepjes Catona 4 ply cotton.
Tension is not critical for this project but stitches should be tight enough to avoid the polystyrene ring showing through.
Pattern Notes
The cover for the wreath is worked in turned rows. Chains are not included in the stitch count.
The cover for the wreath is worked in turned rows. Chains are not included in the stitch count.
UK Crochet Terms - Abbreviations
This pattern is written using UK Crochet Terms - they are NOT the same as US ones - please familiarise yourself with the UK terms, to avoid your work being distorted!
The “dc” abbreviation used in this pattern refers to UK double crochet. The equivalent stitch in US terms is single crochet - if you are used to US patterns you need to work single crochet everywhere this pattern says “dc”. If you work US dc (equivalent to UK Treble) the finished item will be elongated and the stuffing will show through.
If you are used to working in US Crochet Terms you can find a conversion chart HERE.
If you are unfamiliar with any of the terms used in this pattern, you can find a chart of the UK Crochet terms used HERE.

Wreath - front
|

Wreath - back
|
About the Wreath Cover
The cover is made as a flat panel which is then stitched round the polystyrene ring, joining the long edges of the panel at the back of the ring.
The cover is made as a flat panel which is then stitched round the polystyrene ring, joining the long edges of the panel at the back of the ring.

Wreath cover is worked as a flat panel
The pattern below shows you the number of stitches and rows I used for my 25 cm diameter ring using a 2mm hook with Scheepjes Catona 4 ply cotton.
If you are using different yarn, you may need a starting chain slightly shorter or longer than mine - make the starting chain as specified below but before you start working the rows, try wrapping it round the wreath - the ends should just meet - if they don't, add or remove a few chains until it fits. Once you've crocheted the first couple of rows, try it round the ring again - it may have tightened up, depending on your natural tension.
If you are using different yarn, you may need a starting chain slightly shorter or longer than mine - make the starting chain as specified below but before you start working the rows, try wrapping it round the wreath - the ends should just meet - if they don't, add or remove a few chains until it fits. Once you've crocheted the first couple of rows, try it round the ring again - it may have tightened up, depending on your natural tension.

Checking length of starting chain
You may also find that you need a few more or fewer rows than me - again it's trial and error. You will probably find the crochet strip has a bit of "give" or stretch in it. You want the finished piece to sit snuggly round the polystyrene ring.
I changed colour every two rows, without a set sequence - there's more red and green rows as i had more of those yarns left than the blue! Have fun with it and make your own sequence up, using as many colours as you like or just use a single colour if you prefer.
Change colour on the last yrh of the last dc in a row.
I cut the yarn, leaving a starting and finishing tail, every time I changed colour. You can see the yarn tails in the picture of the crochet panel above I used the tails to sew the cover together.
Cutting the yarn between colours does mean there's a lot of ends to weave in - if you prefer, you can carry the yarn up the side of the piece, rather than cutting it, picking up the colour again when you want to use it for the next row. This will give you less tails to weave in, so it's quicker, but it doesn't give quite such a neat finish on the back of the wreath as you'll be able to see the strands of yarn that you've carried up the side and you'll need to use a single long strand of one colour to sew the edges together.
Cutting the yarn between colours does mean there's a lot of ends to weave in - if you prefer, you can carry the yarn up the side of the piece, rather than cutting it, picking up the colour again when you want to use it for the next row. This will give you less tails to weave in, so it's quicker, but it doesn't give quite such a neat finish on the back of the wreath as you'll be able to see the strands of yarn that you've carried up the side and you'll need to use a single long strand of one colour to sew the edges together.
The Pattern
With your chosen colour, chain 34.
Row 1: Starting in the second chain from the hook, 33 dc. Turn. 33 sts
Row 2: 1 ch, dc across. Turn.
Changing colour when you wish, repeat Row 2 until you have a panel long enough to cover the ring all the way round. I ended up with 186 rows for mine.
Fasten off.
With your chosen colour, chain 34.
Row 1: Starting in the second chain from the hook, 33 dc. Turn. 33 sts
Row 2: 1 ch, dc across. Turn.
Changing colour when you wish, repeat Row 2 until you have a panel long enough to cover the ring all the way round. I ended up with 186 rows for mine.
Fasten off.
Making Up
Patience and pins are your secret weapons here! Take your time. Pin the cover onto the ring. I found it easiest to pin the long edge without the yarn tails in place first, working from the inside of the ring, as shown with the mini sample in the image below - the dotted green line indicates the mid-line of the back of the ring, which I used as a guide for pinning the first long edge.
Patience and pins are your secret weapons here! Take your time. Pin the cover onto the ring. I found it easiest to pin the long edge without the yarn tails in place first, working from the inside of the ring, as shown with the mini sample in the image below - the dotted green line indicates the mid-line of the back of the ring, which I used as a guide for pinning the first long edge.

Pin one long side in place first
Once you've pinned the whole of the first edge in place, bring the second long edge up to meet it, making sure the end of each row on the second edge lines up with its own end on the first edge to avoid a twisted finish.

Make sure you line the ends of the rows up carefully
Once you're happy with the positioning, use the yarn tails to sew the two long edges together and weave in the ends.

Back seam on Wreath
Once you've finished attaching the cover, you can attach the characters in place. Again, take your time with the positioning, pinning them in place first.
My handy hint - which sounds a bit odd but really helps! - is that, once all 6 characters are pinned in place, take a photo of the wreath and look at that, rather than the wreath itself to check that the characters are evenly spaced and that their positions create a pleasing shape overall. I know it sounds weird, but it's MUCH easier to spot if something's sticking out or a bit looks lopsided by looking at it on screen rather than the thing itself.
Once you're happy with the positioning, sew the characters into place. Keep picking the wreath up as you do this to make sure the characters are secured in place firmly and don't move when the wreath is hanging vertically. Weave in the yarn tails.
Once everything is sewn on and you're happy with how it all hangs, make the hanging loop below and sew it to the top of the wreath. Depending on what you'll be hanging the wreath from, you may want to sew the hanging loop on the other way round, so that its short ends sit across the wreath- they would then be in line with the stripes in the picture below.

Hanging loop
Hanging Loop
Made in turned rows.
With colour of your choice, chain 76.
Row 1: Starting in second ch from hook, 75 dc. Turn.
Rows 2-4: 1 ch, dc across.
Fasten off. Using the yarn tail, sew the short edges of the piece together. Don't sew it onto the wreath until you have stitched all the characters in place.
Made in turned rows.
With colour of your choice, chain 76.
Row 1: Starting in second ch from hook, 75 dc. Turn.
Rows 2-4: 1 ch, dc across.
Fasten off. Using the yarn tail, sew the short edges of the piece together. Don't sew it onto the wreath until you have stitched all the characters in place.
Terms of Use
I am happy for you to donate, gift or sell any of the my crochet chums you make if you are an individual crafter - please credit mycrochetchums.com as the designer.
If you do wish to sell your my crochet chums, it is your responsibility to ensure that the finished item complies with the relevant toy legislation in your country.
Please be sure to use toy grade stuffing and do not add buttons, bells, ribbons etc that could be a danger to small children.
The patterns are copyright protected and are not for commercial use. They cannot be sold, transmitted, distributed or reproduced in any form or by any means. I’ve worked hard to create the designs - please don’t sell my patterns - it’s just plain mean!
About mycrochetchums
I started mycrochetchums at the end of 2020 to give me something to focus on during lockdown and to make creative use of a box of Amigurumi Yarn that was an impulse purchase I was feeling guilty about!
I’m loving creating these cute characters and sharpening my tech skills in the process as I wrangle with managing a website and social media.
Check out the mycrochetchums Facebook page - drop me a message there if you have any feedback about the pattern or would like to share a picture of the end result.
You can also find me on Instagram @mycrochetchums.
If you have any questions about any of my patterns (or any other ami you may be working on) please email me at: [email protected] - I’ll do my best to help!
Happy Crocheting!
Pia x
©2022PIA SIMPSON/ MYCROCHETCHUMS
